
BawCraftWorx Downloads

All BawCraftWorx downloads are now available for purchase from my Etsy shop. Please Click "SHOP" In the Menu Above. Or Click the following link: https://www.etsy.com/shop/BawCraftWorx
Tuesday, January 25, 2011


3 Free Scut Files
These are the first 3 Scut files I've ever made so enjoy:)


An Angel card for sending blessings to people you love and cherish.

I use the letters from this file on the top layer of the card above (optional).
You + Me Heart By Archangel

I originally made this for a friend of mine using only Plantin Schoolbook, & edited it to suit everyone.

Monday, January 24, 2011
Toadily Kissable Card

Blog Pruning In Progress...
Ok I'm in the process of Blog Pruning, which means that I'm de-cluttering and removing old or dual posts. All of the cut files I've posted on my blog have been copied over to the "Free Cut Files" Page to make them easier to find :) All other related posts that used to be here can be found on my forum in the cricut section: http://bawcraftworx.forumotion.com/ I had way too many topics to browse and I wanted to simplify it a bit by getting rid of the unnecessary posts. I'm keeping all of my cricut stuff here just moving the cut files & resource links to my forum to de-clutter the blog.I've also deleted all of the Posts titled A Worthy Cause + Updates since I completed that mission :)
Wednesday, January 19, 2011
Cuttlebug Links

http://thecuttlebugspot.blogspot.com/
http://ikkiscuttlebugcupboard.blogspot.com/
http://www.craftcritique.com/2007/02/cuttlebug-carnival.html
http://cuttlebugblog.blogspot.com/
Cuttlebug Tips: How to sandwich the Nestabilities
How to sandwich the Nestabilities
by Great Nanny On Provo craft community Forum
Here's what I use for the nestabilities and it always works; hope this will help you.
Cutting Sandwich: (stack from bottom up)
1. A plate
2. C plate
3. Spellbinders die face up (rough side up)
4. Paper or cardstock
5. B plate
Run through Cuttlebug
Embossing sandwich: (stack from bottom up)
1. A plate
2. B plate
3. Die face up (with die cut still in die)
4. 3 pieces of cardstock
5. 1 Spellbinders tan polymer mat
6. B plate
Run through Cuttlebug
Good luck!
Sunday, January 16, 2011
PIMP YOUR CRAFTING SPACE

My current space is a broom closet (NOT kidding) so out of necessity, I've had to improvise and conjure MORE space out of thin air, in so doing, I've come up with some cool ideas to help you pimp your own space...
* Sort paper flowers by colors and stick them in Ziploc sandwich bags to make the ones you want easier to find. They should still fit in that same drawer if you squeeze the air out of the bags.
* Decorate your paper holders (just the front part that shows-as well as any other "boring" containers that aren't see through:) with different patterned papers, add stickers, buttons, beads ribbon, brads, bling, and/or paper flowers to embellish, make tags with coordinating or contrasting papers to label the containers, stamp images on them too for cuteness. It really makes a BIG difference.
* Label your drawers & containers! As you acquire more things from swaps, workshops, classes, hauls - (aka shopping sprees gone overboard lol), you're going to need to categorize everything or you WILL hide things on yourself by having misplaced them, meaning put them in the wrong spot because you were distracted by someone or something (like having to pee REALLY BAD!) lol. So, if you start early, (like I DIDN'T DO) you'll prevent that from happening.
* Store loose ribbon, buttons, clips & other accessories in clear glass or plastic jars. You'll SEE them and actually make MORE use of them.
* Last but certainly MOST important, Catalog EVERYTHING you own & INSURE IT. In case of theft/damage, fire etc. If you're a professional crafter, or even if it's a hobby but you have a LOT of stuff; EVERYTHING in your room is an ASSET-Furniture and crafting supplies!
I'm speaking from personal experience here, I've had all of my inventory
stolen by some jealous exes. I didn't know at that time, that I could
have insured it all. Needless to say I'm out about $1,000,000,000 that's
right: 1 million dollars because they wanted revenge.
Friday, January 14, 2011
Top 10 Signs of a Scrapbook Addict

Are you a scrapbooking fool? See if you meet the criteria for a Scrapbook Addict!
1. You're the only one at a social gathering yelling, "Just one more photo,everyone; I don't have enough for a two-page layout!
2. Blue photo split backs and scraps from your corner rounder cuttings can be found in unusual places - school lunch bags, briefcases, pants pockets, the dog's water bowl.
3. A regular sandwich is no longer acceptable--it must be cropped or cut with decorative edges.
4. You try to claim your album purchases as a medical expense because it's such good "therapy".
5. You buy a new pink swimsuit because it matches the pink photo mounting paper.
6. Your child is the only one in agriculture class who thinks "crop" is to "cut your photos."
7. You decide to give your child piano lessons so you'll be able to use the musical instrument stickers that are in the Big Pack.
8. You redecorate your family room to coordinate with your photo album covers.
9. Your three year old wants to know if her coloring book is "archival quality".
10. You're in a fender bender and your first thought is, "I wonder what die-cut shape will coordinate with this event?"
Of course a scrapbook addict doesn't follow a 12 step program but a 12 x 12 step one.
-from: http://www.favecrafts.com/Scrapbooking-Tips/Top-10-Signs-of-a-Scrapbook-Addict
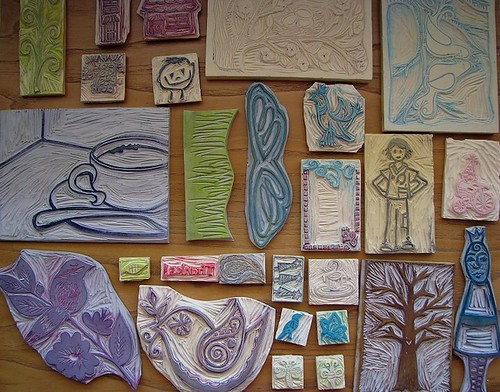
How to Make Your Own Rubber Stamps
Quote:
How to Make Your Own Rubber Stamps
If you like to embellish your scrapbook pages with stamps, try making your own stamps for a completely personal design. Though many methods exist for transferring an image onto a carving block, tracing is probably the easiest. Creative Kismet shows you just how beautiful homemade stamps can be, with some tips on how to care for them.
You Will Need:
Tracing Paper
Clip Art of your preferred image
Rubber Carving Block- Speedball sells large carving blocks, affectionately called “the pink stuff” by crafters, including a SpeedyStamp Kit with carving tools. Mastercarve is another maker.
Carving tool- Craft or X-acto knifes will work for the initial cuts, but you may have trouble scrapping out the relief parts of your design. Detailed carving requires special tool(s) with a sharp, V-shaped end.
Sharpened No. 2 Pencil
Stamp Pad
Instructions:
1. Print out an image from the web or find an image you would like to make into a stamp. For beginners, use a less-detailed image with thick, heavy lines. This will be easier to carve.
2. Place the tracing paper over your image and trace over the solid parts of the image with your sharp pencil. Don’t just outline; fill in the entire image.
3. Flip your tracing paper over and place your image face-down on the carving block (the pink stuff). For words, you want the mirror image of the word on the stamp so that the actual print comes out correctly. You can check this by holding your stamp up to a mirror. If you’ve traced a word or words, you should already accomplish this by flipping over the image onto the carving block.
4. Hold the image steady on the block with one hand as you rub the back of the tracing paper with a blunt object, such as a spoon. This will transfer the graphite onto the carving block.
5. Once transferred, you are ready to carve! For a better-looking “positive image,” you want to carve away the light areas from around your pencil image.
6. Cut off the block with your image from the rest of the carving block. Start with the most intricate areas of the design first. For carving between lines (the middle or insides of circles for example), carve around the lines of the image first, and then carve out the area between.
7. Carve away from the lines of the image using shallow, horizontal cuts. When working around curves, keep the carving tool in your one hand steady and guide the block with your other hand.
8. The cut out parts of the stamp should slope away from the raised surface, rather than straight down or undercutting the raised surface. This will make the stamp surface steadier.
9. Once your image has been carved out, remove all the excess rubber material from around the image. You want to remove everything that you do not want stamped. You can use a larger tool from the Speedy Stamp kits or X-acto knife to carve away larger areas.
10. When you think you’re done, test out your stamp with a stamp pad or even a highlighter. With stamping, you will likely find additional areas that require carving. Don’t worry; homemade stamps are charming in their slight imperfections.
11. You can mount your stamp onto a piece of wood at this point, with or without a piece of foam separating the stamp from the mount, but it’s not a necessity. If you do mount the stamp to a slightly-larger piece of wood, remember to stamp the top of the wood with your stamp before gluing it on for easy reference.
Enjoy!
from: http://www.favecrafts.com/Rubber-Stamping/How-to-Make-Your-Own-Rubber-Stamps-How-To-Carve-A-Stamp-Make-Stamps-for-Scrapbooking
Wednesday, January 12, 2011
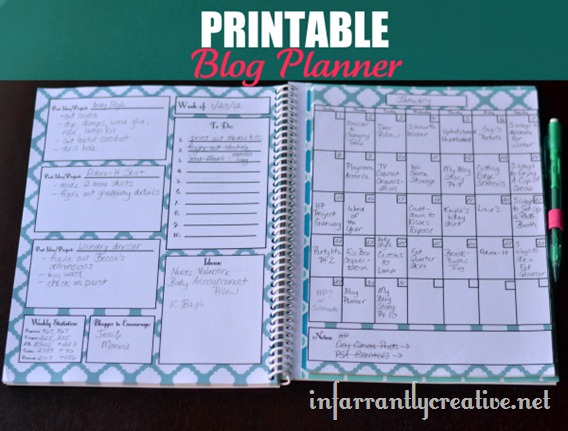
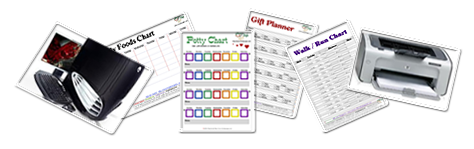
UPDATED Free Printable Organizer & Planner Sheets
UPDATED Monday September 2nd 2013
I needed to make an organizer from scratch so I went on-line and printed off various pages from the following sites. They are ALL FREE and the Downloads are SAFE! Non-corrupt. SO I just HAD to share:) The link to each place is posted below the image from their websites. Note: The 8 at the top of the list are my personal faves but I've used all of them and they are all great Enjoy! -Archangel


http://www.mommytracked.com/downloads
 http://donnayoung.org/index.htm
http://www.chartjungle.com/printables.html
 http://professorpoppins.blogspot.ca/2011/03/family-planner.html
 http://www.momsbudget.com/printables/scrapbookplannerpink.html
 http://www.cupcakediariesblog.com/2013/01/free-weekly-menu-planner-printable-4.html

 http://www.infarrantlycreative.net/2013/04/weekly-menu-planner-templates.html


Subscribe to:
Posts (Atom)