BawCraftWorx Downloads

All BawCraftWorx downloads are now available for purchase from my Etsy shop. Please Click "SHOP" In the Menu Above. Or Click the following link: https://www.etsy.com/shop/BawCraftWorx


Sunday, September 20, 2015

Homemade Crackle Paint


Homemade Crackle Paint
While store-bought crackle medium allows you to quickly create the look of a cracked, weathered paint finish on furniture, decor and craft projects, you can achieve the same look without the premade product. Make your own crackle medium from regular school glue or wood glue for a fraction of the cost. Even a bargain-brand school glue works.

Selecting the Surface
    Homemade crackle medium works on any surface that can be brushed with glue and latex or acrylic paint. Wood, paper, cardboard and thick fabrics such as art canvases are all potential project surfaces. Paint the project piece in a desired base color using latex or acrylic paint; if the item already has a suitable base coat, such as a red chest of drawers, there's no need to repaint it. If it appears too glossy or if it may contain a coating that could prevent the glue from adhering well, scuff the surface gently with sandpaper, and then wipe the dust away.

Making and Applying the Medium
    A homemade crackle medium is an incredibly simple recipe -- you only need a suitable glue. School glue and wood glue both work; school glue is generally less expensive and available at more stores. Even dollar-store school glue works as a crackle medium. Brush the glue over any areas you want to crackle, such as the seat on a wooden chair and parts of the chair back. Apply glue over the entire piece if you want all of it to crackle, but if the project is large, work in a small area at a time, otherwise the glue will dry too fast.

Paint With Perfection
    Use a flat latex or acrylic paint for the top coat, otherwise the crackling may not happen. Brush the paint over the glue while it is still tacky to achieve the crackle effect. Brush only once over the glue, rather than using several brushstrokes in the same area, or you may hinder the crackling process. As the paint and glue dry, the cracks occur. Once the paint is completely dry, feel free to sand some of the top color away in areas that did not crack, such as edges and corners that would normally see a lot of wear over time.

Special Considerations and Tips
    If you've used a commercially sold crackle medium before, don't expect as long of a wait between applying your crackle medium and applying the top paint color. Glue-based crackle medium is dry enough to paint in a matter of minutes, so touch the project after five or 10 minutes to see if the glue is almost dry but still tacky. If the glue dries completely and you've missed the painting-time window, apply another coat of glue and get ready to paint. For large cracks, apply a thick layer of glue, and use a thin layer for small cracks.

Source: http://www.ehow.com/way_5622214_homemade-crackle-paint.html


Homemade Texture Paste Medium Recipe

HOME MADE TEXTURE PASTE/MEDIUM!! By
It's a really easy recipe, quick to make and super inexpensive!  (Now I have to admit I have no experience with store brand texture mediums so I can't say how they compare but I thought this stuff worked nicely!)

It's a really easy recipe, quick to make and super inexpensive!  (Now I have to admit I have no experience with storebrand texture mediums so I can't say how they compare but I thought this stuff worked nicely!) 
TEXTURE PASTE/MEDIUM RECIPE
1/2 cup Baking Soda
2 Tablespoons white school glue
1-2 Tablespoons White Acrylic Paint
(some water may be necessary)
 
Instructions:  I took an air tight container and put in my baking soda.  I then added the glue, acrylic paint and started mixing.  I used a couple of disposable chopsticks to mix it up (we like take out sushi heehee) ....I just mixed to get a smooth consistency, I added a few drops of water to get it to the consistency I wanted.  There are many types of texture mediums in the store, from light to heavy, so the amount of water you add will depend on the heaviness of the texture you are looking for.  Done!
(The mixture keeps well in the air tight container....I made this layout a few weeks ago and kept it on my craft shelf, I just checked it and it's still perfectly usable....some of the moisture was floating on top, I just gave it a stir and it was good to go!)
 
In my research I also saw some recipes that used talcum powder instead of the baking soda, I haven't tried it with talcum powder but I bet it would give a slightly smoother texture.  For my design below, the slightly rougher texture was perfect for my brick design. 
So here again, me and my thrifty ways! LOL!  I find where I live, I find it hard to find masks, but I did have the Dusty Attic Brick Wall chippies in my stash.  I throw next to nothing out.  I used the negative space left from my brick chippies that I've used in past projects and used it as a mask.  Just filled in with the paste.  Below you can see the result when I lifted the 'mask' 
 I found that the medium chipped off a little here and there so what I did was brushed a little Gesso over the design to bind it better. (I think next time I make it I'll add a touch more glue).   I then rubbed a few different chalk inks on the design (after it dried) to pick up the texture more. 
 
Info Copied From: http://gabriellepollacco.blogspot.ca/2012/08/making-my-own-texture-paste-fun-with.html


Home-made Texture Paste & Glitter Paste Tutorial

Home-made Texture Paste & Glitter Paste Tutorial By

Hello Everyone!

I have been getting a lot of questions regarding my home-made texture paste, so I thought it was about time I let you in on how I make it. By no means did I invent the concept, but I did spend a lot of time and products perfecting my ratio formula, so I feel that I can call this my own recipe. I have included 3 different versions today, all of which have great uses for different things and all of them are ratio recipes. The advantage of a ratio recipe is you can make as much or as little as you want, all you have to do is change the size of your portion container!!

OK, here we go...

RECIPE #1 - STICKY PASTE

INGREDIENTS:
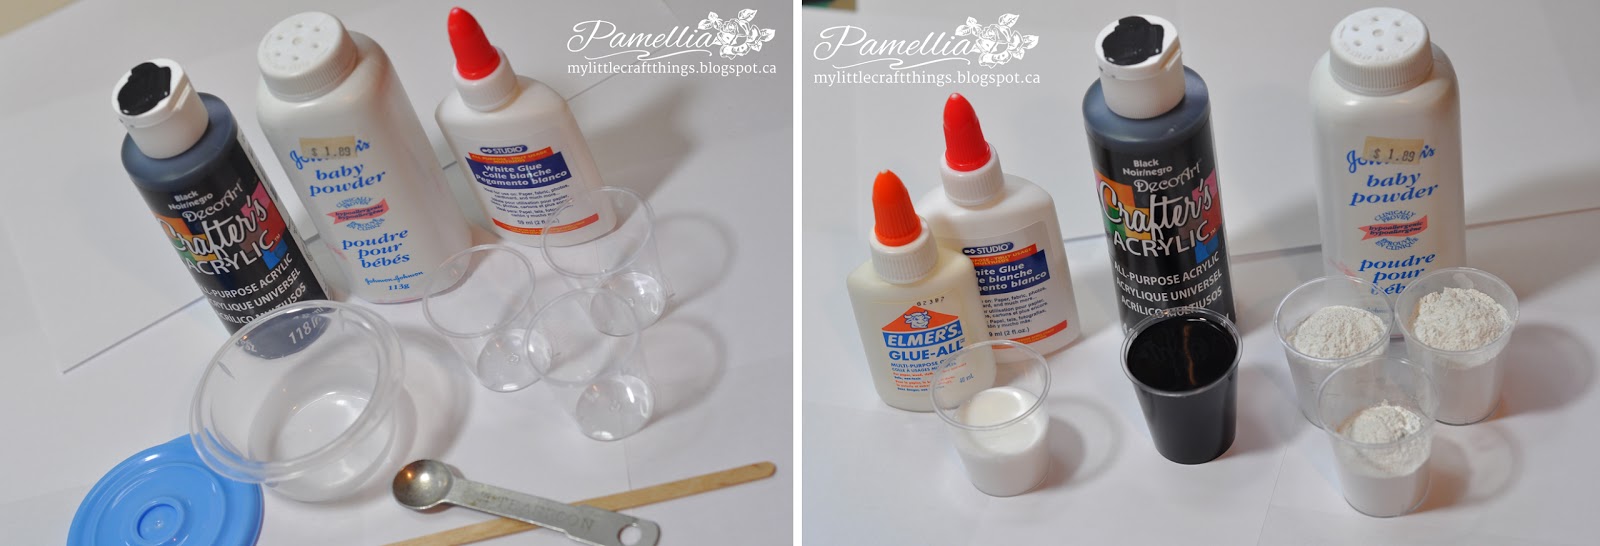
- Baby powder or talc powder - white, non-scented is always good. The perfume magnifies under heat, so you be the judge of how much time you can spend breathing in those fumes.
- White Glue - cheap, dollar store glue actually works great. The only thing you don't want is glue that dries too fast or glue that is really shiny when it dries.
- Acrylic Paint - again, just some cheap, dollar store paint will do the trick! Nothing fancy required!
- Portion Cups - I use plastic ounce glasses from the party supply store which makes about 1/3 cup of paste
You will also need a container to mix in that can be sealed air tight and something to stir with.

RECIPE:
- 1 portion of paint, 1/2 portion of glue and 2 portions of powder


DIRECTIONS:
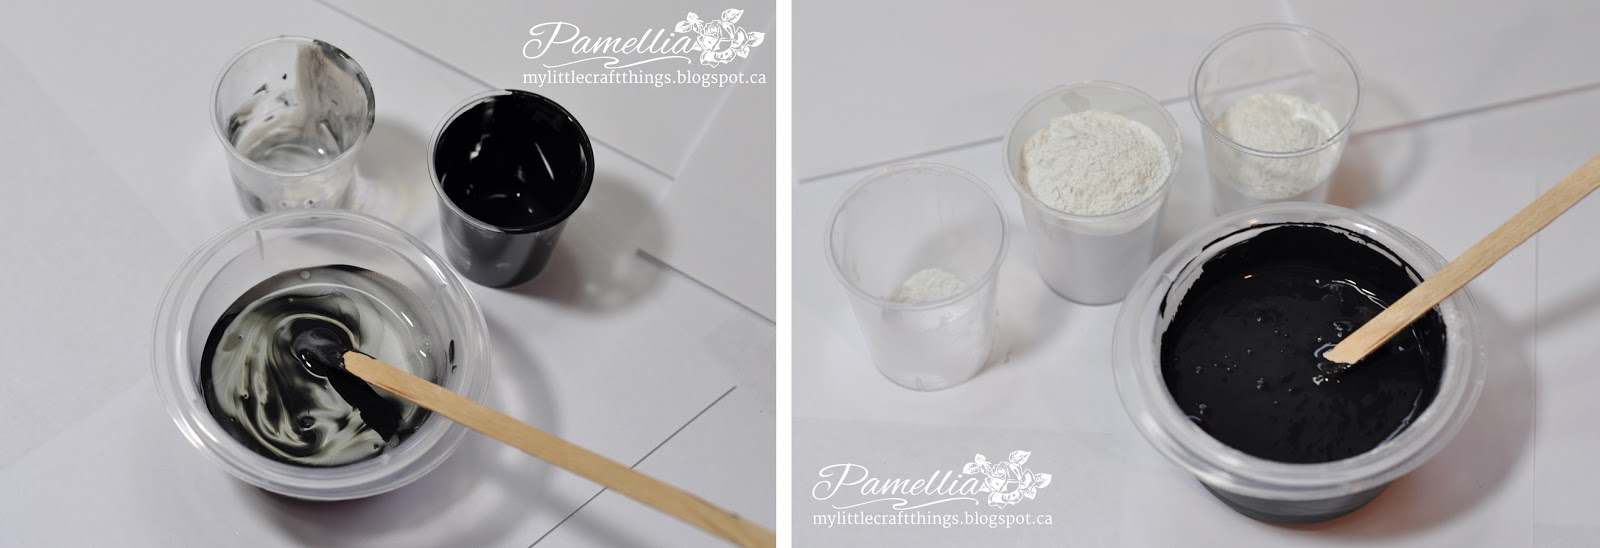
- put your wet ingredients in first (the glue and paint), then just like when your making tea biscuits or a pie crust...slowly add the baby powder, making sure to stir well. This will ensure that you get out all of the lumps making it nice and creamy and easier to spread...just like your pastry!!!


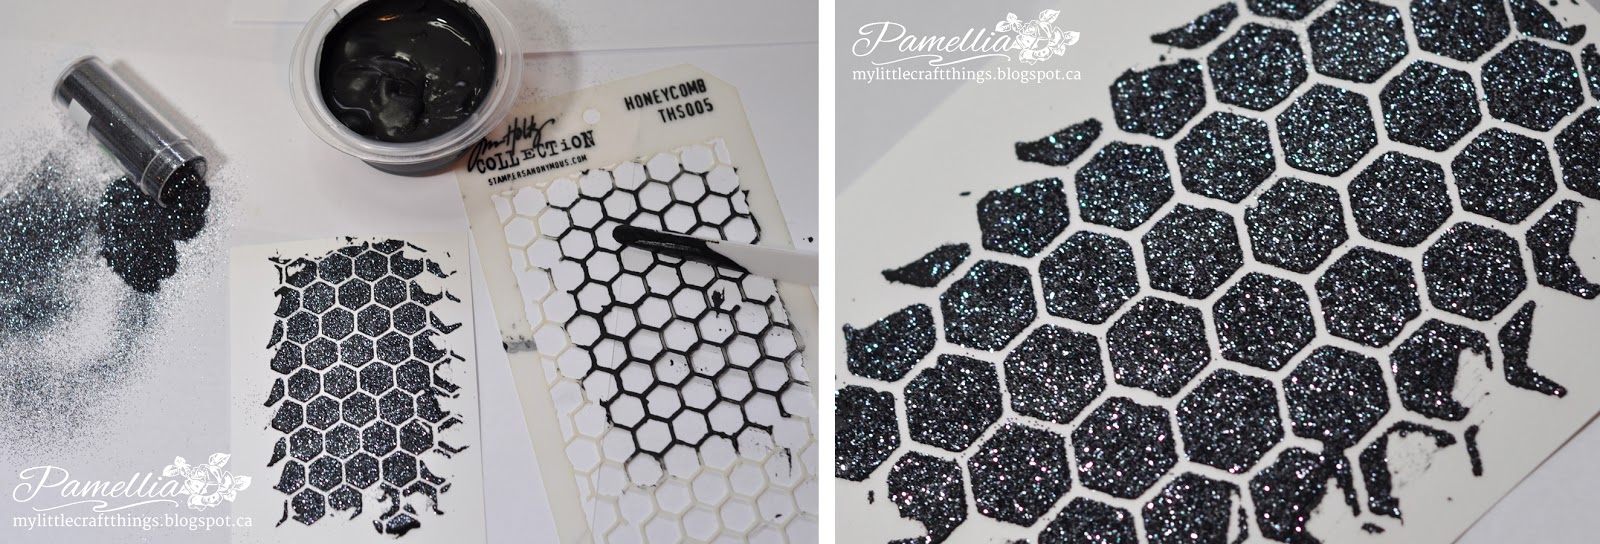
BEST USE FOR STICKY PASTE: This is the paste you want to use if you would like to sprinkle on a little glitter or embossing powder. It is also great if you want a smooth pattern with crisp edges.

PRO'S - It is really smooth, so it spreads easily. It is really wet, so the glitter and embossing powders stick to it really well. Because of the slower drying time, you have leeway for clean up and putting the cap back on. It makes a wonderful, clean, crisp pattern once it dries. Perfect for elegant or CAS style cards.

CON'S - It is really wet, so it takes a lot longer to dry and warps the paper more. You won't get a good texture with it because it isn't stiff enough to maintain peaks and grooves. You also cannot lay it on very thick or it just falls like a badly baked soufflé!

In this sample, I sprinkled on some gunmetal glitter.


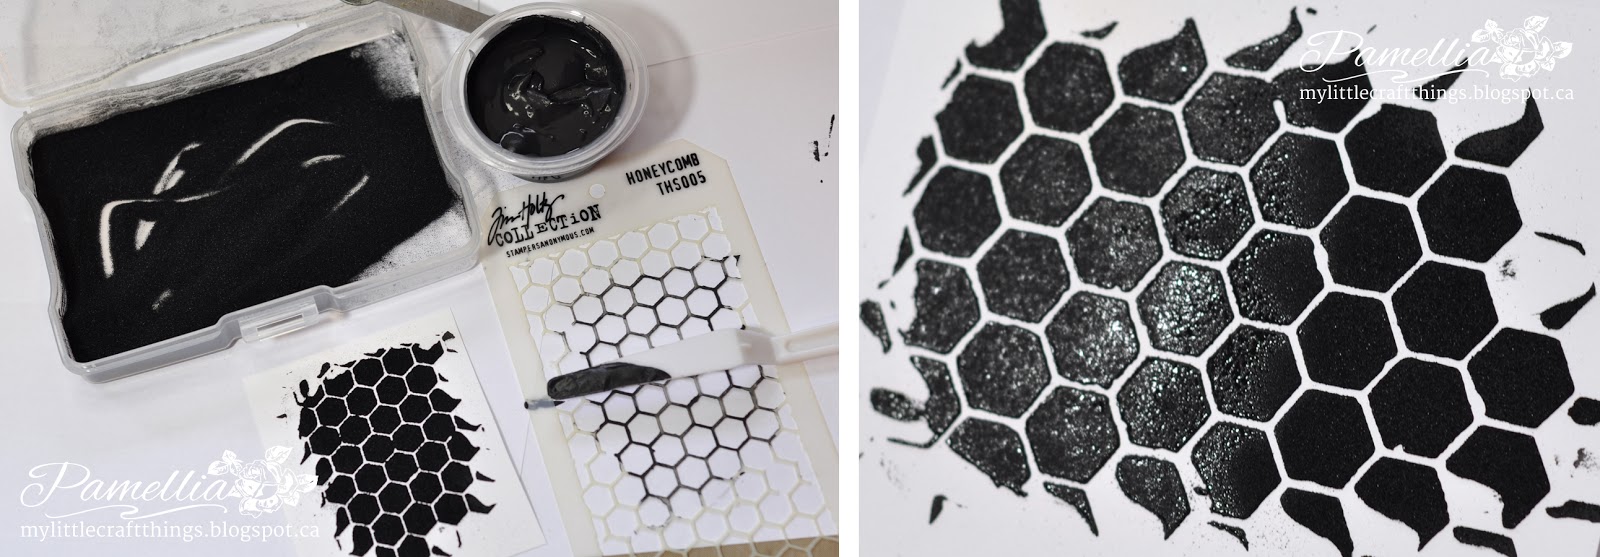
In this sample, I sprinkled on black embossing powder. You can get two looks from this. If you leave it the way it is, it has a soft velvety appearance and feel to it. Or you can use your heat gun and melt it like you normally would for a shiny surface (that will also act as a resist to preserve the colour of your paste when you start inking).

If you decide to melt your embossing powder, be sure to wait until your paste is completely dry before taking the heat gun to it. If the paste is still wet, the powder will burn long before it melts. You can see below, half I left as it was and the other half I melted with the heat gun (too soon, I might add) lol.


RECIPE #2 - DRY PASTE

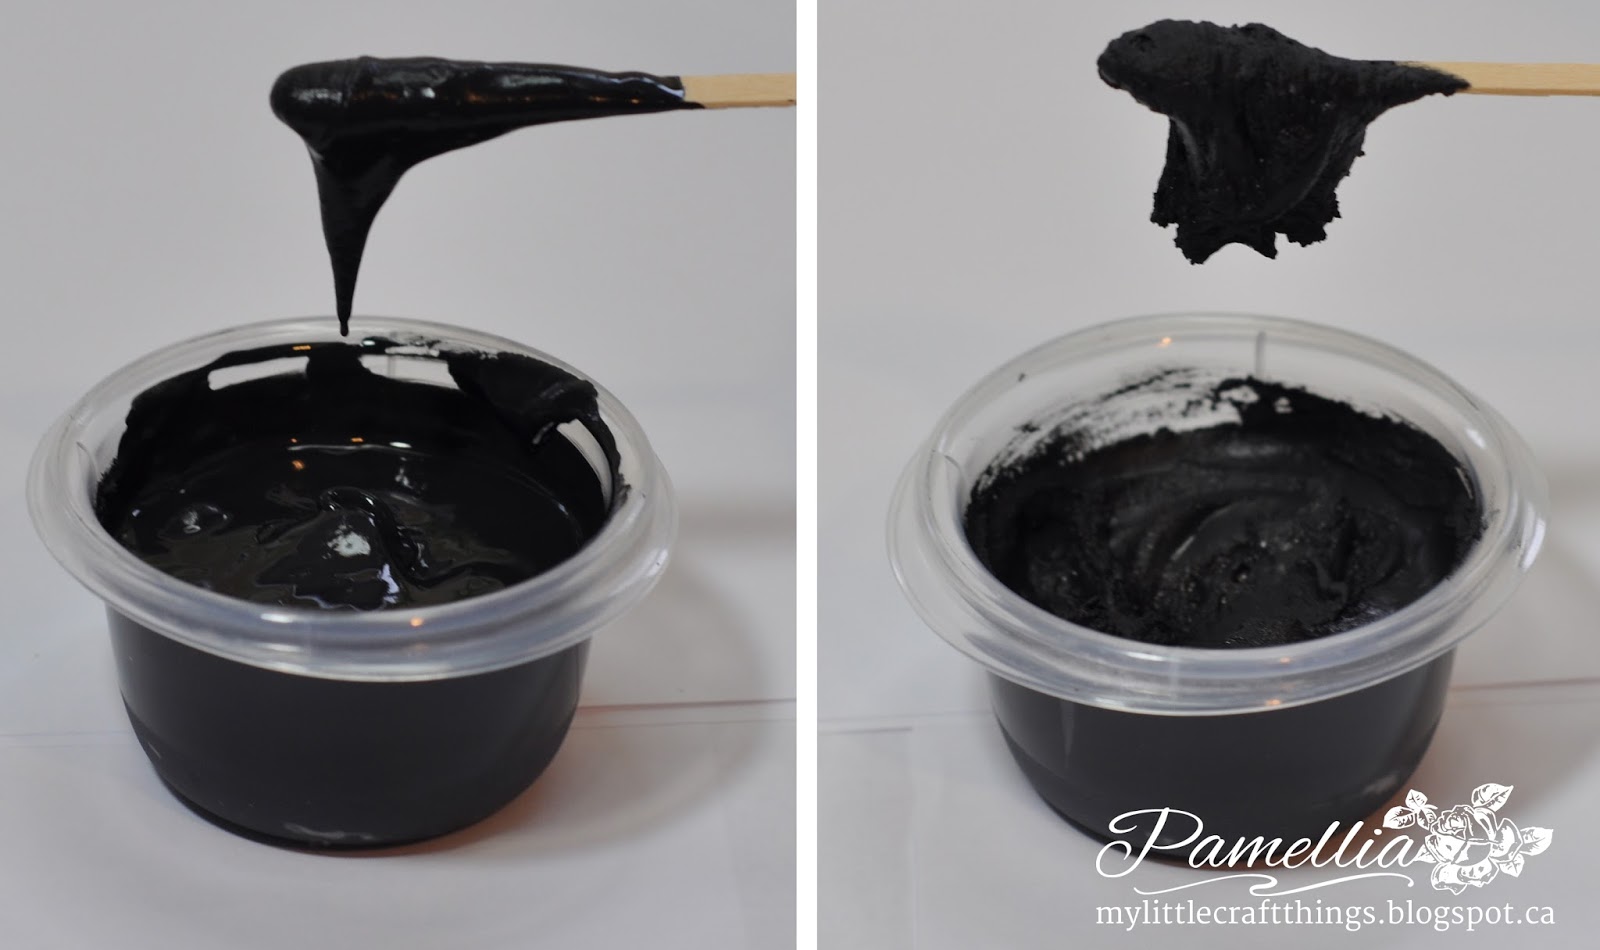
The only difference between the recipe for sticky paste and dry paste is that the dry paste has 1/2 portion extra of baby powder added to it (depending on the brands of paint and glue, you may have to add a bit more powder). Here is a shot so you can see the difference in shine and consistency.


BEST USE FOR DRY PASTE: This is the paste you want to use if you are going for texture. It's the base for my bark technique and it also makes great clouds, wood planks, ocean waves and all sorts of other textures.

PRO'S - It has less glue and paint, so the drying time is considerably less than the sticky paste and it also doesn't warp your paper too badly. It's, of course, fantastic for texture and depth because you can lay it on thick and mold it! It looks great on vintage or grungy projects.

CON'S - Don't leave the lid off because it will dry out crazy fast, right in your container! It can be a little harder to spread because it's so thick and pasty - and make sure you wash your stencil right away or it will crust right on.

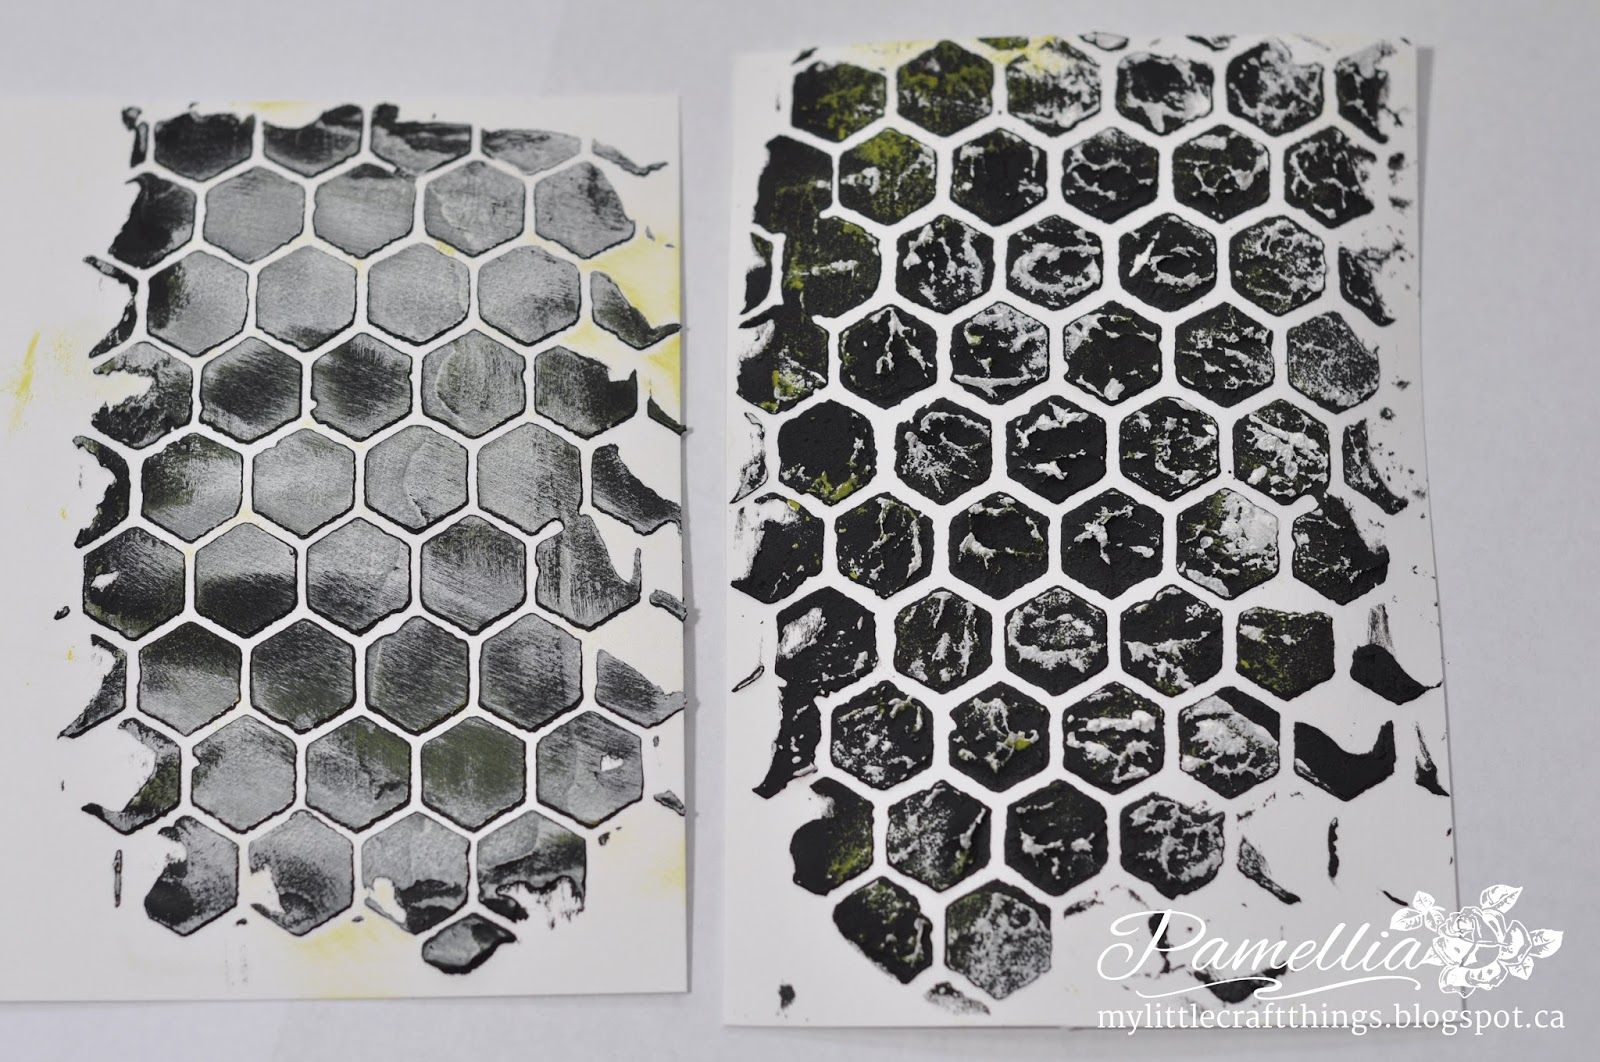
Here is one done with Sticky Paste and one done with Dry Paste, so you can see the difference in the finished textures. I have spread some yellow and white paint on it to make it easier for you to see.


RECIPE #3 - GLITTER PASTE

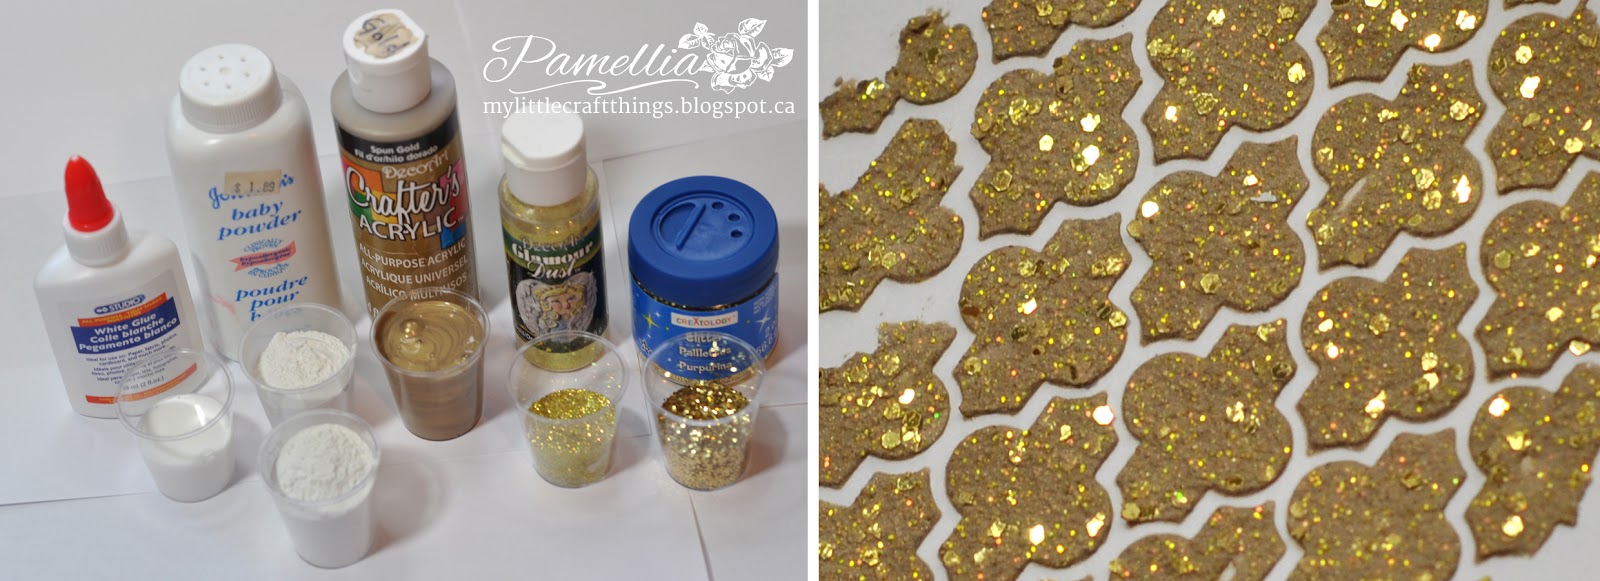
INGREDIENTS:
Baby powder or talc powder - same as before.
White Glue - same as before.
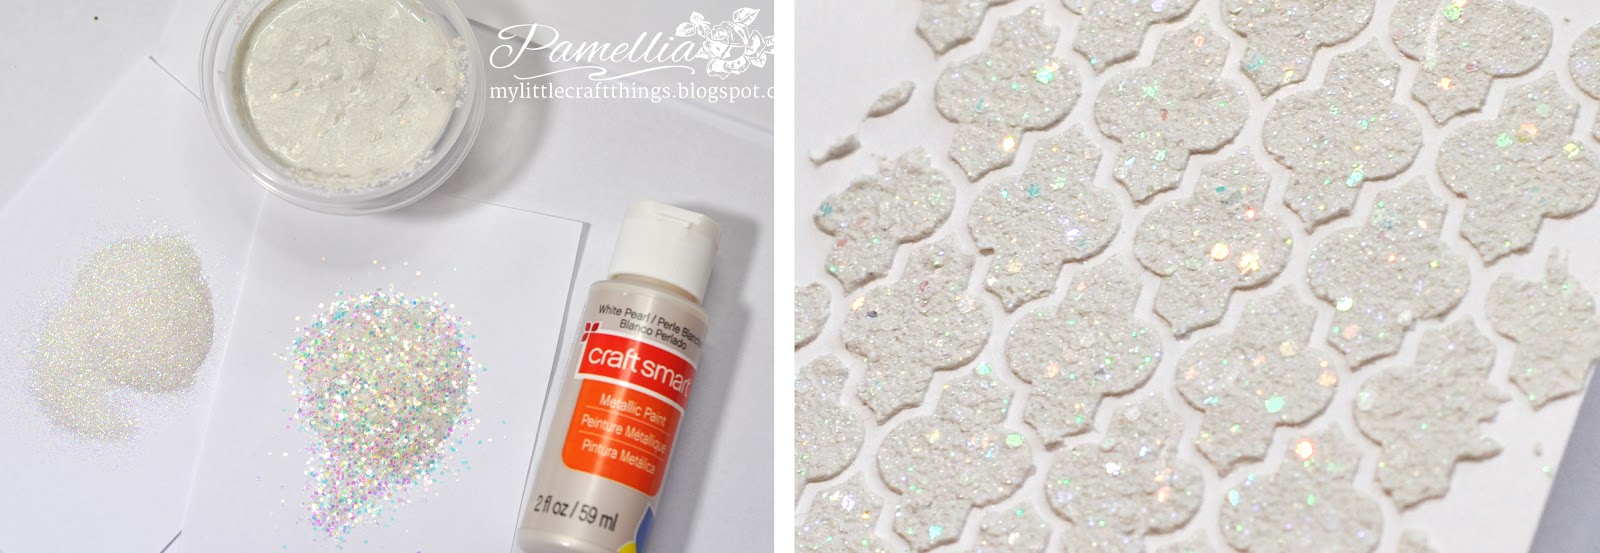
Metallic or Pearl Paint - again, just cheap acrylic paint is fine. If you don't have metallic, that's ok, it just adds a little extra shimmer is all.
- Fine Glitter - Any brand will do, although the boldest, brightest versions work the best. This is the glitter that will blend in with the paint to give it an overall shimmer.
- Coarse Glitter - The coarse glitter is what will grab the light and really make it sparkle.

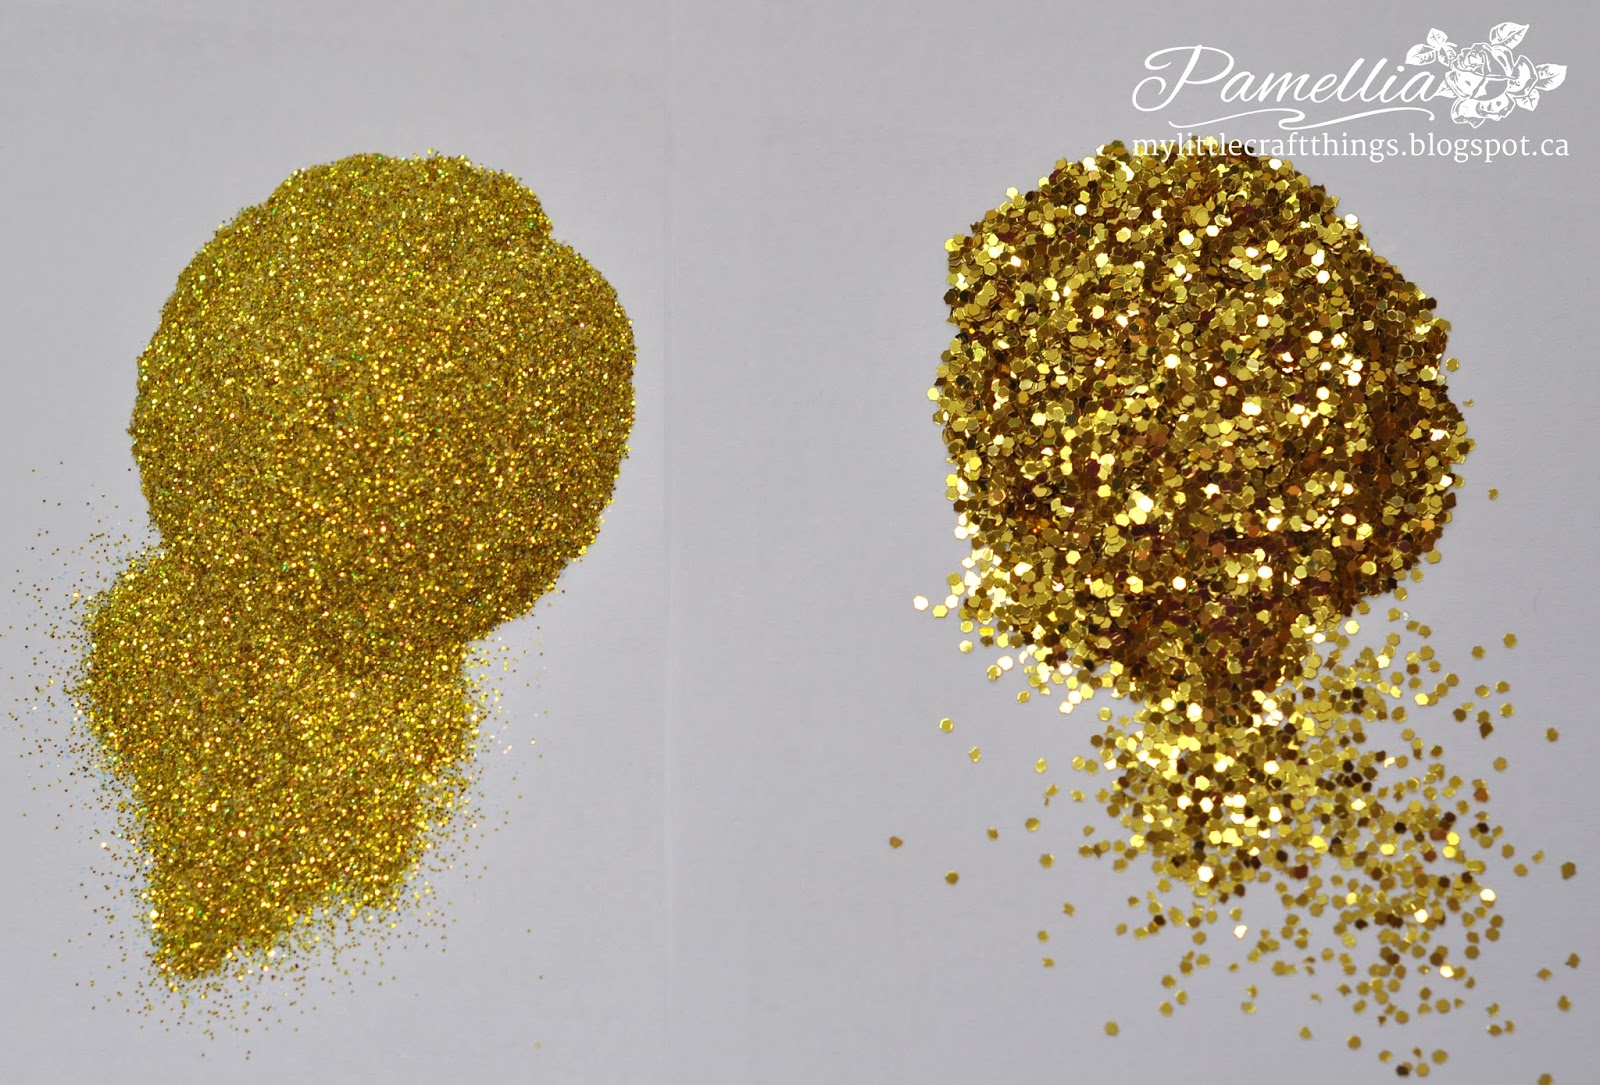
For the coarse glitter, I recommend the flat octagon style of glitter. Most cheap glitters for kids crafts will be great for this. I know we all love our Frantage, but those chunks do not spread, they drag and leave gaps in the paste. Tim Holtz distress glitter, I'm sad to say, does not work either. It's not quite sparkly enough and gets coated with the paint, never to be seen again. Here are the glitters that I use...lots of shimmer to them.


RECIPE:
- 1 portion paint, 1/2 portion glue, 2 portions powder, 1/2 portion fine glitter and 1/2 portion coarse glitter

BEST USE FOR DRY PASTE: Christmas, of course, but pretty much any other project too!

PRO'S - You absolutely cannot get a beautiful shimmer and texture like this, simply by sprinkling glitter on top of a product! And as a bonus, it's so freaking cheap, you can make some in every colour!!

CON'S - You may never want to use plain texture paste again!!

In this sample I used pearl paint and iridescent glitters, you should really zoom in and check it out!


Well, I hope you enjoyed my really long winded tutorial! If anyone tries out my recipe and has some success, I would really love to see your projects!! Come on back and leave me a link, so I can swoon over your wonderful creations!

I will be leaving a permanent link on my Tutorials Page, in case you can't find this post.


That's it for today. Thank you for stopping in and for all the amazing comments. I read and appreciate every single one! If you have any questions, please let me know.

Recipe Copied from: http://mylittlecraftthings.blogspot.ca/2014/09/home-made-texture-paste-glitter-paste.html


Thursday, September 17, 2015

Layout 8 Live In The Moment

 Layout 8 Live In The Moment

 Close up of CTMH stamp, because I sealed it with a glaze it created a glare above when I tried to take a pic of it. The solid black outline, dots around the edge and triangles in the corners were hand drawn by me for added detail.

The original was too glossy and made my pages stick together because I sealed it with Deco Art Tripple Thick Brilliant Gloss Brush On Glaze. So I fixed it by re-sealing it with my Homemade Mod Podge/Matte Gel Medium, I like it much better now and the pages don't stick anymore when I close my journal, so here are the updated pix of the finished project....


Created September 12, 2015.
See Supply List below for anyone who wants to recreate the background... :)

Supply List:
  • Home-made Gesso (Baking Soda Based) See Recipe Here!
  • Home-made Mod Podge
  • Black Tissue Paper.
  • Deco Art Acrylic Paint: White, Splattered & Smooshed onto background.
  • Stencils: TCW Mini Tile Texture (6"x6"), Folk Art Swirls (9 1/2"x8 1/2").
  • Stamp: CTMH Skylark (scrapbooking workshop).
  • Ink: CTMH Archival Black.
  • IDentipen For outline & embellishing stamped image.
  • Paper: Elite Image printer paper from Office Depot.
  • Deco Art Triple Thick Brilliant Gloss Brush On Glaze.
  • Tim Holtz Distress Ink: Festive berries (smudged over paint in random spots by hand).


Layout 7 Art In My Heart

 Layout 7 Art In My Heart

Created September 9, 2015.
I mixed home-made gesso with yellow ink and used the Art Is Stencil to create texture in this layout.

See Supply List below for anyone who wants to recreate the background... :)


Supply List:
  • Home-made Gesso (Baking Soda Based) See Recipe Here!
  • Deco Art Acrylic Paints: White, Navy Blue, Christmas Red, Deep Red, Pure Pumpkin.
  • Stencils: Heidi Swapp: Honeycomb (6"x6"), TCW- Mini Art Is (6"x6"), & Chicken Wire (12"x12").
  • Lettering: Hand painted by me and outlined w/ IDentiPen Black.


Layout 6 You Inspire Me

 Layout 6 You Inspire Me

Left Detail
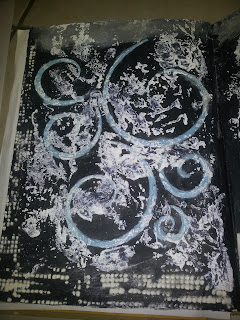
 For the Grey background I smeared on home-made gesso (baking soda based) mixed with ashes with a plastic card and then scraped it off after the color of the ashes stained the paper.

I created the angel wings by tracing a necklace I have from sammydress.com (here) with a pencil and then just painting them using deco art acrylics.

Right Detail

The flames are made with a stencil and home-made gesso (baking soda based) mixed with CTMH Re-Inker in sky.

The mini Ledger stencil was used to create the above by mixing home-made gesso (baking soda based) with CTMH Re-inker in Denim.

Above: Home-made gesso mixed with ashes and extra white glue shaped freehand into a heart & random splotches pressed on with a plastic card to create this charcoal/concrete effect.

Created September 4, 2015
See Supply List below for anyone who wants to recreate the background... :)

Supply List:
  • Home-made Gesso (Baking Soda Based) See Recipe Here!
  • Copic Sketch Marker Black 110 (for framing edge of layout).
  • Stencils: Heidi Swapp - Chevron (6"x6"), TCW Mini Flames (6"x6"), TCW Mini Ledger (6"x6").
  • Tim Holtz Distress Paint: Salty Ocean.
  • Deco Art Acrylic Paint: White & Silver Morning (for angel Wings).
  • Tim Holtz Distress Paint: Salty Ocean (used with chevron stencil).
  • IDentiPen Black for outlining.
  • Zig Calligraphy Marker Black (for lettering).
  • Cloud: Elite Image printer paper (from Office Depot), Hand drawn by me w/ IDentiPen Highlighted w/ Stickles & CTMH White Daisy Ink.
  • Stickles: True Blue.
  • CTMH Ink: (Re-Inkers) White Daisy, Denim & Sky.
  • Bazzil Basics Taxtured Cardstock: Blue (for lettering, which was hand written by me).


Layout 5 King Of My Heart

 Layout 5 King Of My Heart


Left Detail

Right Detail

 For the concrete/cement effect here, I mixed my home-made Gesso with ashes from my cigarettes (it took a LOT of ashes to get this color because there is white acrylic paint in my gesso base and applied it with a plastic card. 

The other colored gessos were made by simply mixing a few drops of Tim holtz distress Inks with the white gesso. I applied these with stencils using a plastic spoon.


Created September 3, 2015

See Supply List below for anyone who wants to recreate the background... :)

Supply List:
  • Homemade Gesso (Baking Soda Based) See Recipe Here! Applied on page bg w/ plastic card.
  • Stencils: Heidi Swapp Confetti (6"x 6"), TCW Mini Tile Texture (6"x 6").
  • Jute Hearts From $ store, inked with Dylusions Ink Sprays in: Calypso Teal, Pure Sunshine, Cut Grass & Chopped Pesto.
  • Tim Holtz Fastener (can't remember the name of it, it's retired now, but includes jump rings, swivel clasps and a chain).
  • Eyelet Recollections from Michaels (used in 2nd jute heart to attach fastener).
  • Heart shaped Stick Pin & Paperclips from The Scrapping Turtle
  • Tim Holtz Distress Inks: Black Soot, Squeezed Lemonade, Mustard Seed, Salty Ocean, Evergreen Bough, Broken China, Mowed Lawn, Tumbled Glass, Peacock Feathers.
  • Maya Road Journey Accents (Metal Heart Ribbon Holder-Yellow).
  • CTMH Finger Dabbers (used to apply inks).
  • Stamps From Michaels (Lips and others not shown), Word KING was stamped with Coffee House Alpha by Inkadinkadoo Clear stamps, added swirls by me..
  • Trinkets: crowns, vintage watch & turquoise pendant from Michaels.
  • Project Life Journal Cards (3"x4") Graph & Assorted Colors (used for inserts (not shown) in bottom pouch).
  • Patterned papers for 'Of My Heart' Bo Bunny. Inked by me.
  • SU Stampin' Up Tag punch (On journal card insert).


Layout 4 Dream

 Layout 4 Dream


Created August 31, 2015.
See Supply List below for anyone who wants to recreate the background... :)

Supply List: 
  • Homemade Gesso (Talc Based) See Recipe Here!
  • Ranger/Dylusions Ink Sprays (Brushed on bg with paint brush): Calypso Teal, Pomegranate Seed, Pure Sunshine.
  • CTMH Acrylic Stamp set: Dreamer.
  • Stickers: (Used in corners) Accents by Remarks & American Crafts.
  • IDentiPen Black (for quote)
  • Scrap paper from my stash (to write quote on).


Layout 3 Sister

 Layout 3 Sister


Created August 30, 2015.
See Supply List below for anyone who wants to recreate the background... :)

Supply List:
  • Homemade Gesso See Recipe Here!
  • Martha Stewart Create Butterfly Stamps.
  • Spectrum Noir Markers: BP1, BP3 & BP5.
  • IDentiPen Black.
  • Keys & Amethyst Pendant From Michaels.
  • Stickles Glam Pink.
  • Stickers: Accents by Remarks & American Crafts.
  • Flowers: Recollections From Michaels.
  • Pink Lace from my stash.
  • Bazzill Basics Textured Cardstock (for butterfly stamps).
  • Bling: Assorted from my stash.
  • Stencil: Heidi Swapp Tiny Hearts (12" x 12")
  • Ranger Liquid Pearls- Petal Pink.
  • Patterned Paper from my stash (used for heart).


Layout 2 Bliss Is Thinking Of You

 Layout 2 Bliss Is Thinking Of You

Created August 28-29, 2015.

See Supply List below for anyone who wants to recreate the background... :)
Supply List:
  • Home-made Gesso See Recipe Here!
  • Recycled Tissue Paper.
  • Stamps Used: Fabulous Flourish by Hero Arts (used in all 4 corners), Tree Swing by Stampendous, Bliss, Flourish Border & Ivy border (all 3) by Inkadinkadoo.
  • Tim Holtz Distress Paints: On Background- Squeezed Lemonade, Ripe Persimmon, Salty Ocean, Mowed Lawn. On Tree Swing- Gathered Twigs, Peeled Paint.
  • IDentiPen Black.
  • Flowers from my stash.