

Quote:
How to Make Your Own Rubber Stamps
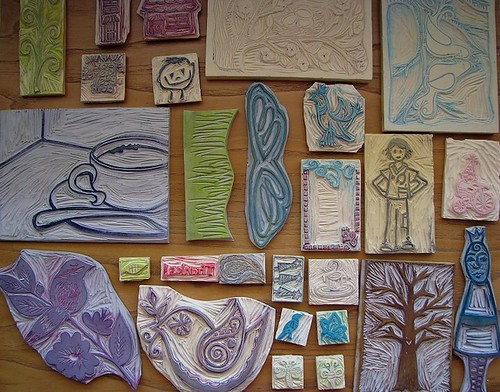
If you like to embellish your scrapbook pages with stamps, try making your own stamps for a completely personal design. Though many methods exist for transferring an image onto a carving block, tracing is probably the easiest. Creative Kismet shows you just how beautiful homemade stamps can be, with some tips on how to care for them.
You Will Need:
Tracing Paper
Clip Art of your preferred image
Rubber Carving Block- Speedball sells large carving blocks, affectionately called “the pink stuff” by crafters, including a SpeedyStamp Kit with carving tools. Mastercarve is another maker.
Carving tool- Craft or X-acto knifes will work for the initial cuts, but you may have trouble scrapping out the relief parts of your design. Detailed carving requires special tool(s) with a sharp, V-shaped end.
Sharpened No. 2 Pencil
Stamp Pad
Instructions:
1. Print out an image from the web or find an image you would like to make into a stamp. For beginners, use a less-detailed image with thick, heavy lines. This will be easier to carve.
2. Place the tracing paper over your image and trace over the solid parts of the image with your sharp pencil. Don’t just outline; fill in the entire image.
3. Flip your tracing paper over and place your image face-down on the carving block (the pink stuff). For words, you want the mirror image of the word on the stamp so that the actual print comes out correctly. You can check this by holding your stamp up to a mirror. If you’ve traced a word or words, you should already accomplish this by flipping over the image onto the carving block.
4. Hold the image steady on the block with one hand as you rub the back of the tracing paper with a blunt object, such as a spoon. This will transfer the graphite onto the carving block.
5. Once transferred, you are ready to carve! For a better-looking “positive image,” you want to carve away the light areas from around your pencil image.
6. Cut off the block with your image from the rest of the carving block. Start with the most intricate areas of the design first. For carving between lines (the middle or insides of circles for example), carve around the lines of the image first, and then carve out the area between.
7. Carve away from the lines of the image using shallow, horizontal cuts. When working around curves, keep the carving tool in your one hand steady and guide the block with your other hand.
8. The cut out parts of the stamp should slope away from the raised surface, rather than straight down or undercutting the raised surface. This will make the stamp surface steadier.
9. Once your image has been carved out, remove all the excess rubber material from around the image. You want to remove everything that you do not want stamped. You can use a larger tool from the Speedy Stamp kits or X-acto knife to carve away larger areas.
10. When you think you’re done, test out your stamp with a stamp pad or even a highlighter. With stamping, you will likely find additional areas that require carving. Don’t worry; homemade stamps are charming in their slight imperfections.
11. You can mount your stamp onto a piece of wood at this point, with or without a piece of foam separating the stamp from the mount, but it’s not a necessity. If you do mount the stamp to a slightly-larger piece of wood, remember to stamp the top of the wood with your stamp before gluing it on for easy reference.
Enjoy!
from: http://www.favecrafts.com/Rubber-Stamping/How-to-Make-Your-Own-Rubber-Stamps-How-To-Carve-A-Stamp-Make-Stamps-for-Scrapbooking

How to Make Your Own Rubber Stamps
If you like to embellish your scrapbook pages with stamps, try making your own stamps for a completely personal design. Though many methods exist for transferring an image onto a carving block, tracing is probably the easiest. Creative Kismet shows you just how beautiful homemade stamps can be, with some tips on how to care for them.
You Will Need:
Tracing Paper
Clip Art of your preferred image
Rubber Carving Block- Speedball sells large carving blocks, affectionately called “the pink stuff” by crafters, including a SpeedyStamp Kit with carving tools. Mastercarve is another maker.
Carving tool- Craft or X-acto knifes will work for the initial cuts, but you may have trouble scrapping out the relief parts of your design. Detailed carving requires special tool(s) with a sharp, V-shaped end.
Sharpened No. 2 Pencil
Stamp Pad
Instructions:
1. Print out an image from the web or find an image you would like to make into a stamp. For beginners, use a less-detailed image with thick, heavy lines. This will be easier to carve.
2. Place the tracing paper over your image and trace over the solid parts of the image with your sharp pencil. Don’t just outline; fill in the entire image.
3. Flip your tracing paper over and place your image face-down on the carving block (the pink stuff). For words, you want the mirror image of the word on the stamp so that the actual print comes out correctly. You can check this by holding your stamp up to a mirror. If you’ve traced a word or words, you should already accomplish this by flipping over the image onto the carving block.
4. Hold the image steady on the block with one hand as you rub the back of the tracing paper with a blunt object, such as a spoon. This will transfer the graphite onto the carving block.
5. Once transferred, you are ready to carve! For a better-looking “positive image,” you want to carve away the light areas from around your pencil image.
6. Cut off the block with your image from the rest of the carving block. Start with the most intricate areas of the design first. For carving between lines (the middle or insides of circles for example), carve around the lines of the image first, and then carve out the area between.
7. Carve away from the lines of the image using shallow, horizontal cuts. When working around curves, keep the carving tool in your one hand steady and guide the block with your other hand.
8. The cut out parts of the stamp should slope away from the raised surface, rather than straight down or undercutting the raised surface. This will make the stamp surface steadier.
9. Once your image has been carved out, remove all the excess rubber material from around the image. You want to remove everything that you do not want stamped. You can use a larger tool from the Speedy Stamp kits or X-acto knife to carve away larger areas.
10. When you think you’re done, test out your stamp with a stamp pad or even a highlighter. With stamping, you will likely find additional areas that require carving. Don’t worry; homemade stamps are charming in their slight imperfections.
11. You can mount your stamp onto a piece of wood at this point, with or without a piece of foam separating the stamp from the mount, but it’s not a necessity. If you do mount the stamp to a slightly-larger piece of wood, remember to stamp the top of the wood with your stamp before gluing it on for easy reference.
Enjoy!
from: http://www.favecrafts.com/Rubber-Stamping/How-to-Make-Your-Own-Rubber-Stamps-How-To-Carve-A-Stamp-Make-Stamps-for-Scrapbooking
No comments:
Post a Comment