Ok Every1, It's time for me to fire up my trial version of DS & play with my big bug. As difficult as it is to pull myself away from everyone's FABULOUS blogs, I'm feeling the bite pretty hard right now. I'm Off to make my Own Heart book, I have Plantin Schoolbook, So I'll be using that for a start! Wish Me luck:)
Love & squishes From your Resident Archangel:)

BawCraftWorx Downloads

All BawCraftWorx downloads are now available for purchase from my Etsy shop. Please Click "SHOP" In the Menu Above. Or Click the following link: https://www.etsy.com/shop/BawCraftWorx
Saturday, January 31, 2009
Free Soap Making Lessons By Email
 Soap Making Lessons & Site
 I Recieve FREE Weekly Emails From (The Author Of These Lessons): Dave Cushion. His Teachings Are Amazing & I Highly Reccomend His Book. Visit Dave's Site To Get Your Own Free Lessons Delivered Right To Your Email. For More Info See Below...
Note All Soap Making Lessons By: Dave Cushion
Daves Website: http://www.soapmakingmadesimple.com
Daves Book: Soap Making Made Simple - The Complete Guide To Making Fragrant And Elegant Soap!
Click Here To Learn More: http://www.soapmakingmadesimple.com/soapbook.html
Soap Making Made Simple is a publication of:
Expert Infoproducts LLC
3953 Norway Pine Drive
Dewitt, Michigan 48820
How To Make an Herbal Oil Infusion for Soap Making

Calendula Petals Infusing in Olive Oil-David Fisher
Whether it's for the healing properties of the herbs or the scent, it's not hard to infuse herbs into the oils you use to make soaps, lotions and other body products. Calendula and lavender are quite popular to infuse, but eucalytpus, sage, patchouli and rosemary are also wonderful.
Difficulty: Average
Time Required: 1 hour or longer
Here's How:
1. Put the herbs (1/4 - 1 cup) and oil (16 oz.) into the crock pot or double boiler. Stir gently.
2. Heat the herbs very slowly, stirring gently every once in a while.
3. Bring the temperature to about 120 - 130 degrees. Any higher and you risk "cooking" the herbs rather than helping them to infuse your oil.
4. Let the oils simmer for an hour or so. Let them cool. Bring back to temperature and simmer again for another hour or so. If you're using a reliable crock pot, you can just set it to heat for a few hours.
5. Let the herbs cool a bit, but not completely.
6. Strain the oil through three or four layers of cheesecloth into your mason jar. Be sure to squeeze the last bits of oil from the herbs - like a tea bag.
7. Use the oils as you normally would in soap and toiletry recipes.
Tips:
1. Herb suggestions: Lavender, Calendula, Peppermint, Patchouli, Sage, Chamomile, Catnip (great to keep mosquitoes away!, Annatto (for color). The herbs should be crushed or lightly ground but not powdered!
2. You can simmer the oils for several hours, but it's important to not cook/fry them.
3. You can re-infuse the oils several times to make double or triple strength oils.
4. Some people skip the crock pot altogether and just place the oils in a warm window to steep for 24-48 hours. This would be akin to making "sun tea". I personally prefer the crock pot method, but the window method does work.
What You Need:
* Double Boiler or Crock Pot
* 16 oz. of an oil with a good shelf life - jojoba, olive, coconut, macadamia
* Approx 1/2 - 3/4 cup of dried herbs
* Mason Jar
* Cheesecloth
* Thermometer
 By David Fisher, About.com
-From: http://candleandsoap.about.com/od/coldprocesssoapmaking/ht/htoilinfusion.htm
Bath Salt Recipes 3
Bath Salt Recipes

Made using our Fine Crystal Sea Salt
Our Liquid Dyes and Liquid Pigments should be diluted with distilled water.
Ratio: 1 to 3 parts of distilled water to 1 part of liquid dye or liquid pigment.
The dilution ratio will depend on the shade you are trying to achieve.
If your finished bath salts will be exposed to sunlight for extended periods of time,
use pigments instead of dyes because dyes will fade where pigments will not.
Materials Required for Making Bath Salts
Large Glass or Metal Bowl
Metal Spoon
Small Spray Bottle (optional)
Cosmetic Safe Fragrance Oils
Cosmetic Safe Dyes or Pigments
Cellophane Bags, Glass or PETE Plastic Containers
Basic Bath Salt Recipe
1 Lb. of Sea Salt
Cosmetic Safe Dye or Pigment (As Desired)
1 Teaspoon of Cosmetic Safe Fragrance Oil
Pour the salt into a large glass or metal container.
Add a cosmetic safe dye or pigment to the salt and stir well -
the salt should be dry to the touch after you stir it.
Add the fragrance oil and stir well.
Store the salt in cellophane bags or glass containers.
Note: Do not use plastic bags because the fragrance will evaporate through the plastic.
Variations to the Basic Bath Salt Recipe
A) For every pound of salt add 1/2 pound of Epson Salt.
B) For every pound of salt add 1/2 pound of Baking Soda.
C) For every pound of salt add 1/4 pound of Epson Salt and 1/4 pound of Baking Soda.
-From: http://www.naturesbouquet.com/soap_making_recipes.htm
Bath Salt Recipes 2
 Witchy Bath Salt Recipes
 Aphrodisiac of the Gods
Patchouli
Ylang-Ylang
Papaya Leave
Milk Powders
Oatmeal
Epsom & Sea Salts
Energizing Mix of Purity
Bay
Ginger
Cinnamon
Peppermint
Epsom & Sea Salts
Female Salts of Power
Relax and rejuvenate your personal powers in this stimulating bath potion.
Bergamot oil - Prosperity, Sensuality & Protection
Ginger - Healing & Strength
Bay leaf - most powerful of herbs, Wisdom, Love and Balance.
Sea Salt
Milk Powders
Oatmeal
Personal Magnetism
Need to Sell Yourself? Attract More Business?
This ritual bath salt is beneficial for you, if your business depends on your personal magnetism:
Sea Salt
Ginger - grated fresh
Basil - fresh
Essential basil oil
Pour into your bath and soak in it the morning of important meetings. In addition you can use Drawing Powder after drying off.
Bath Salt Recipes 1
Bath Salt Recipes
Ingredients:
* 3 cups Dead Sea salt, regular sea salt or Epsom salt, or a blend of two or three of these salts. Sea salts typically come in several grain sizes. Combining multiple grain sizes can make your salts more appealing. Keep in mind, however, that more course grains do take longer to dissolve in the tub.
* 15-24 drops of your selected essential oil or essential oil blend. Be sure and take heed in the safety data for the oil(s) you choose to use.
* 1 tablespoon fractionated coconut oil or other carrier oil for moisturization (optional)
Directions:
Place the salt mixture into a bowl. Add the drops of your chosen essential oils. Mix very well with a fork. Add the mixture to a pretty jar, salt tube, or container that has a tight fitting lid. After a day, you may wish to mix well again to ensure that the oils have blended very well.
Add 1/2 - 1 cup of the salts to running bath water. Mix well to ensure that the salt has dispersed well in the tub before entering. To keep the essential oils from evaporating too quickly, you can add the bath salts just before getting in the tub instead of while the water is running. Sitting on undissolved chunky bath salts can be painful, so make sure the salts have dissolved well before entering.
To Color to Your Salts:
For the most natural bath salt recipe, leave your bath salts uncolored. Certain more exotic salts such as Hawaiian Red Sea salt (a lovely reddish/rust color) and Black Sea Pink salt (a soft pink color) have their own unique color and can be used.
If you would like to add color to your salts, FD&C liquid dye or mica powder can be added before you add the essential oils. When adding FD&C grade liquid dye, be sure to add only a drop at a time and stir well. When adding mica powder, only add a tiny amount (1/16-1/8 a teaspoon is usually sifficient) and stir very well. Using too much dye or mica powder can discolor the water and discolor skin, so be very careful. Leave bath salts at a soft pastel color. Darker salts may lead to problems. It is also important that you make sure that you are using skin-safe colorants and that the user of your bath salt blend does not have any allergies or sensitizations with the colorant that you have chosen.
Soap Recipes 2
More Soap Recipes
Ounces (oz) are determined by weight unless otherwise stated.
Soap I -- Pure Soap
This is the only recipe I've discovered that remains scent-free without adding fragrance to the recipe. This soap is a bit too harsh for bath soap, but great for cleaning, washing dishes, delicate laundry, etc. Great lather and no fragrance.
16 oz coconut oil
2.8 oz lye
1 cup water (8 fluid ounces)
Fat and lye/water temperature about 120 degrees F
Estimated tracing time: 1 1/2 hours
Time in molds: 48 hours
Age: 3 weeks
Soap II -- Pure Soap Mink Oil Shampoo
16 oz weight coconut oil
1/2 cup mink oil or (4 T. Castor oil)
2.9 oz lye
1 cup water (8 fluid oz.)
Oil room temperature. Mix and use lye when the water turns clear. Put all ingredients in the blender. Follow the instructions for "Blender Soap" Don't let this soap trace. Process until the mixture is smooth (no oil streaks) and pour it into molds.
Leave in molds 2 days
Freeze soap 3 hours to release it from the molds.
Age 3 weeks.
Soap III
6 oz coconut oil
6 oz olive oil
5 oz vegetable shortening
2.6 oz lye
1 cup water (8 fluid ounces)
Fat and lye/water temperature about 120 degrees F
Time in molds: 48 hours
Age: 4 weeks
Soap IV
9 oz vegetable shortening
4 oz coconut oil
3 oz lard
2.4 oz lye
3/4 cup water (6 fluid ounces)
Fat and lye/water temperature about 120 degrees F
Time in molds: 24 hours
Age: 3 weeks
Soap V
A traditional and blender soap combination. The fats are expensive, but milk allows for about 12 bars, vs. only 6 bars of the same recipe without milk. Pretty sneaky, hugh?
8 oz weight cocoa butter
5 oz weight palm oil
3 oz weight castor oil
2.2 oz weight lye (sodium hydroxide)
1 cup cold milk (I used 2% right from the frig)
1 cup water
1 tablespoon essential oil (I added 2 chamomile tea bags and 2 jasmine tea bags, dry)
Fats: 100 degree range
Lye/water/milk combination: 125 degree range
Dissolve the lye in the water. Add all ingredients to the blender. Process about 30 seconds, or until the mixture looks smooth and a uniform color. It will not trace. Pour it into the molds (it won't separate, trust me)
Soap VI & VII
16 oz lard or beef tallow
2.2 oz lye
3/4 cup water (6 fluid ounces)
Estimated tracing 45 minutes
Fat and lye/water temperature about 120 degrees F
Time in molds: 24 hours
Age: 3 weeks
Soap VIII -- Beeswax Castile
16 oz weight olive oil
1 oz beeswax
1 oz palm oil
2.1 oz lye
1 cup water (8 fluid ounces)
(melt the beeswax with the fats)
Fat and lye/water temperature about 150 degrees F Tracing time: about 12 minutes FAST! (This is not a good blender soap candidate!) Time in molds: 48 hours Place the soap in a freezer for 3 hours, then remove it from the mold.
-From: Amethysts Wicca: http://www.angelfire.com/realm2/amethystbt/makeyourown.html
Soap Recipes 1
LAVENDER BEESWAX SOAP
4 ounces unscented, clear glycerin soap, 1 teaspoon grated beeswax, ¼ teaspoon lavender fragrance oil, Violet food coloring -- (or one drop each blue & red). Melt the soap over low heat until liquefied. Add beeswax and stir until melted. Remove from heat and add the fragrance oil and food coloring. Stir until blended. Pour into mold and let set for 3 hours. -Author Unknown
2 MONEY SOAP RECIPES
MONEY SOAP 1-(can be used for healing, love, etc also): The easiest way to do it would be to take a bar of pure olive oil soap, or if you can't get that, a bar of glycerin soap, and cut it into shavings.
Melt this slowly in a double boiler, or in a pan over boiling water, and mix the shavings with a bit of water so they don't stick together in the pan.
When you have a nice, smooth consistency to work with, you can add empowered ingredients. Good ingredients to add would be:
-money herbs and oils, such as patchouli, mint, basil, cinquefoil, ginger, sage, Tonka, nutmeg, oak moss and lemon balm. -empowered gold glitter -Green vegetable coloring (or whatever color you correspond money and prosperity with)
Once you have added your ingredients, let the mixture cool slightly until you can start forming it in your hands. You can now roll it into balls, wrap them up in some cheesecloth or muslin, and let them harden.
MONEY SOAP 2-An easier way to make a quick money soap is to purchase some melt & pour glycerin from a craft store - I think they even have it at Wal-Mart. It's sold in blocks. Melt the blocks in glassware over the stove or on the microwave until it is liquid.
Add your empowered ingredients quickly, as melt & pour sets fast. Next, pour the mixture into a mold (these can be purchased also, or you can make molds from just about anything from margarine tubs to juice cans to empty toilet paper rolls with foil on one end) and let the soap set.
Melt and pour soap is easier to work with, because you can add your ingredients much easier, and you don't end up with so much soap afterwards.
You can also make bars that are individual to your needs. For example, try pouring half the mixture into the mold, add a toy coin or a plastic dollar sign which you have empowered, then pour the rest into the mold.
When hardened, you will have a soap with an empowered item in the middle of it. You could even put a charged stone in the middle of the soap. Creating the soap with your individuality only makes it more powerful.
The best part? The above directions can be used for any magickal goal, not just money! One more thing, when using your soap, concentrate clearly on your intentions and visualize! For money, visualize the soap attracting the money to you. For illness, visualize the soap cleaning the illness out of you. -Author Unknown
TRADITIONAL WITCHES SOAP
4 parts of lard 3 ounces of lye 5 cups of water 1 tablespoon of lavender oil 1 tablespoon of patchouli oil 1 cup of fresh strawberry juice 1/4 cup of dried soap bark herb Soap made from jewelweed juices removes all itches.-Author Unknown
Witch Soap -Another Recipe
4 lbs lard 13 oz lye (1 can) 5 cups cold water 1 tbsp lavender oil 1 tbsp patchouli oil 1 cup fresh strawberry juice 1/4 cup dried soap bark herb (optional)
In a large enamel or iron kettle, melt the lard over very low heat. (Never use metal) In a separate pot, stir together the lye & the water. Heat lard until small bubbles begin to appear - do not boil.
Remove from the heat & slowly pour the lye solution into the lard. With a big wooden spoon, stir in the lavender & patchouli oils, the strawberry juice & soap bark herb. Simmer for about 30 minutes, stirring frequently.
Pour into 2-inch deep greased pan & allow to cool overnight. Cut the soap into squares and leave in the pan for at least 3 days before removing. Place the Soap bars on waxed paper & allow them to age in a draft-free area approximately 4-6 weeks before using.
Ritual Soap Base
Cut a four-ounce bar of Castile soap into very small pieces, no larger than 1/4 inch square - the smaller (as long as they're in cube form) the better. Place these in a heat-proof, non-metal container.
Heat slightly less than 1/3 cup of water until almost boiling. Pour the still hot water over the soap chips. Let it sit until it is cool enough for you to handle comfortably. Mix the soap and water with your hands. This should moisten the soap chips, but they should not be floating on the water. If they are floating, add a bit more soap.
Let the soap and water sit for about 9 minutes until mushy. If the soap cubes are still hard, set the bowl in a pan of water and reheat it gently until the soap is soft.
While the soap is melting, mix together the oils, and empower them with your magickal need. Then add 20-50 drops of the combined oils to the soap-water mixture. Very warm water evaporates the oils, so wait until the water has cooled. Mix them in thoroughly. The scent should be strong; if not, add more oils until you can smell them rather than the soap.
Divide the scented soap mass into 3 or 4 parts. Form these into spheres with your hands. Place each on a 9 inch square piece of cotton cheesecloth. Pull the ends tightly around the sphere, gather them at the top, and twist together. Tie the ends closed with a strong string. Repeat with each sphere.
Hang the soap spheres in a warm place for 3 days, or until the soap is completely hard. When the sphere's won't give to finger pressure, remove the cloth wraps. The soaps are ready to be used in ritual baths, or they may be wrapped in clean cheesecloth, labled and given to friends who would appreciate them.
Soap Scrolls


Soap Scrolls...
Supplies needed:
9x11 pan or small tray
freezer paper
1 lb of clear M&P soap base
1 tsp of water
fragrance oil
colorant
optional herbs
handmade paper and raffia
Makes 2 scrolls
Line the pan with the freezer paper leaving a small lip around the edges. Fit the freezer paper down into the four corners making sure it's smooth. Place the pan on a level surface or else the soap will roll to the lowest end and you will not get an even thin sheet. Slowly melt your soap base in the microwave, making sure not to boil it. Add your water, fragrance, color and optional herbs. The water will make the soap more pliable so that it can be rolled like a jelly roll.
Slowly pour the liquefied soap base into the lined pan starting in the middle. The soap will spread out filling the bottom of the pan. Use only 1/2 of the mixture, and reserve the other half for another scroll (or melt only half the soap at a time). Carefully watch and wait for the soap to harden. Once the soap is firm to the touch, pull up one of the 9" sides and start to roll. (We used latex gloves so that it would not show our finger prints). If you wait too long the soap will not roll, so timing is everything!
Once the soap has been rolled into the log, roll it into some wax paper and let it harden further. The wax paper will help to keep it in shape and prevent any sweating. Once hard, trim the two edges and finish with handmade paper and raffia. Makes 2 - 8 oz soap scrolls which can be left whole or cut in half. We used green tea and lime fragrance oils, red and green liquid soap colorants and dried green tea for our herb.
-From: http://www.pvsoap.com/recipe_soapscrolls.htm
Soap With Embeds 2
Milky Rose Soap Bar

Goats Milk is very beneficial to your skin to help make it smooth, supple and relieve dry skin.
These are just a few benefits from Goats Milk!
Rose has long been used for is properties to help deter the effects of aging on your skin.
What you need:
Glass Measuring cup
Metal Spoon
Mold of your choice
1/4 C. Freshly picked or dried rose petals, the more fragrant the better
16oz Clear M&P Soap base
1/8th Cup Goats Milk, may use buttermilk or other milk of choice
1/2 - 1 tsp Rose Petals Fragrance Oil
Microwave
Alcohol in spray bottle
Instructions:
Add 16oz (1 Cup) of Clear M&P Soap base into your measuring cup.
Melt your soap in the microwave at 10-20 sec intervals, stirring between each time, do not allow to boil. Add your rose petals and stir well. The hot soap will help "steep" the petals and allow them to release their beneficial properties. Add your milk and stir well. If the milk causes your soap to cool too much after adding, forming a skin on your base, place back in microwave for 5-10 seconds. Add fragrance oil, stir well and pour into your molds. Spritz on your alcohol and allow soap to set up, approximately 30-40 minutes. Package in cello bags with a few faux rose petals for a very nice look.
-From: http://www.pvsoap.com/recipe_milky_rose_soap_bar.htm
Soap With Embeds 1


~Melt & Pour Embedded with Flowers~
Fool the eye and make an impact this summer with glycerin soap embedded with flowers.
Silk flowers that is! We've embedded soft silk flowers within melt & pour glycerin soap.
Below are instructions and packaging ideas for keeping your creations neat and fresh especially if you're gift giving or reselling your soap.

INSTRUCTIONS:
Clear melt & pour glycerin soap (ours in no-sweat),
any plain mold of your choice with at least 1" in depth, a selection of small silk flowers, fragrance oil, microwave safe measuring cup, plastic wrap, cello bags, and ribbon.
Start by cubing the M&P soap and melting it in the microwave safe measuring cup until liquefied.
Lightly grease the inside of your mold with PAM or Vaseline (optional).
Remove the silk flowers from their stems and place two or three face down in your mold.
Add some fragrance oil to your liquefied soap, stirring well to blend.
Slowly pour the soap into the mold/s.
The flowers may float to the top, so gently push them back into the mold.
Let dry and remove soap from your mold.
Packaging Options:

Wrap in plastic wrap and place into cello bags. Finish with a wired ribbon.
If you're reselling: don't forget to label your product with your company name, ingredients, net weight & contact information.
-From: http://www.pvsoap.com/recipe_flower_embeds.htm
Re-Batch Hand-Milled Soap2
Make Your Own Shredded Soap for Handmilling

Handmilling - the process of rebatching or remelting freshly grated soap with various scents and ingredients. An advantage to handmilling soap is that you can make several different types of soap from just one batch and use a variety of different mold shapes as well.
Supplies needed for Handmilling only:
Any base Cold Process Soap Recipe
Stovetop
Medium size pot
Wooden spoon
Whole milk or distilled water
Essential or fragrance oils
Additives such as grains, botanicals, soap colorants, etc.
Plastic container with a lid
Cheese grater
A variety of molds of your choice
Coffee bean grinder (optional)
1. Follow the directions for any basic cold process soap recipe omitting the scent, grains, botanicals or colorants that may be in the recipe. You are now making plain soap free from any scent or additives other than oils, water and lye.
2. Remove your freshly made soap from its block mold and allow it to air dry in a warm dry room for 3-7 days.
3. Cut soap into chunks or bars and grate into your plastic container. You can store the unused portion in the container until you're ready to handmill. The grated soap should have a consistency of mozzarella cheese. If the soap seems so soft to grate, let it air dry a few more days.
4. Use the grated soap within a 4 month period. Store in the container in a cool dry place.
5. Ready to handmill: Over medium/low heat, add some of the grated soap to your pot filling it to about 3/4 of the way. Add 1/4-1/2 cup of milk or water to the pot, adding more or less if necessary. Stir gently.
6. The soap should begin to melt down and have the consistency of soft mashed potatoes. Stir occasionally adding more of the liquid if necessary. You do not want the soap to become runny, but all of the gratings should melt to a fairly smooth consistency.
7. When your soap has melted down, remove it from the stovetop and let cool awhile. Prepare your ingredients and molds. If you are scenting all the soap in the pot with the same scent, add your essential oil, fragrance oil, or even perfume directly to the soap. If you're making several different scents, then remove the portion needed for that particular scent. The amount of scent will depend on your liking, but as a guideline, about 1 oz per pound of soap. Scents will fade slightly over time, so its better to start out a little stronger.
8. Add any additional ingredients such as botanicals, grains, colorants at this time. Stir in well.
9. Pour into mold/molds. Handmilling allows soap makers to make a variety of soap scents and shapes from just one batch. The soap can also be poured into loaf molds and sliced into bars. Allow molded soap to harden uncovered overnight or several days. The freezer will also help to harden the molded soap and make the release much easier.
10. Finished bars should cure (air dry) for several weeks.
Variations and ideas for handmilled soap:
Exact measurements are not given, since the amount of melted soap may vary.
Amounts suggested are based on 32 ozs of soap.
Calendula Soap:
Calendula is known for its skin healing properties and tea tree essential oil for its antiseptic and blemish clarifying properties, make an unbeatable team. Add 1/2 cup or less of dried calendula (petals only) and tea tree essential oil.
Goat's Milk Soap:
A good choice for sensitive skin. The mild creaminess of goat's milk soap has been enjoyed for centuries. Add 1/4 cup of powdered goat's milk, several drops of Vitamin E oil, peppermint or lavender essential oil.
Milk & Honey Soap:
Another great team, milk & honey together make a luxury bar for softening the skin with added moisture from the honey. Add 1/4 cup of powdered milk and 1/8-1/4 cup of warm honey. Stir well to incorporate the honey. Some may sink to the bottom.
Lavender Oatmeal Soap:
A traditional soap, lavender has been enjoyed for its lovely scent and oatmeal for exfoliating and skin softening properties. Add Lavender essential oil, 1/2 cup finely grated oatmeal, 1/8 cup of finely grated dried lavender flowers.
No More Oily Skin:
The addition of cosmetic clay removes impurities from oily skin. Add 2 tablespoons of Kaolin (China Clay), lemon or lime essential oil.
Rose Soap:
A classic soap for purifying the skin. Add rose fragrance oil or rosewood essential oil, 1/8 cup of finely ground dried rose petals, 2 tablespoons of liquid glycerin, may substitute water in recipe for rosewater, pink soap colorant.
Fresh Banana Soap:
A tropical soothing and mild to the skin soap.Add 1/2 - 1 whole smashed banana, 1 tablespoon of Vitamin E oil, our Bananaroma fragrance oil or any banana and/or coconut fragrance oil of your preference.
Gardener's Grit Soap:
The addition of cornmeal or pumice make this a working hands soap. This is also a good one for the guys! Add 1/4-1/2 cup of cornmeal, several drops of Vitamin E oil, juniper or citronellaessential oil.
-From: http://www.pvsoap.com/instructions_shredded_soap.htm
Re-Batch Hand-Milled Soap1
Re-Batch/Hand-Milled Soap

INSTRUCTIONS FOR REBATCHING
Basic Materials:
Shredded Soap Base
Crock pot, small or medium size
Glass measuring cup
Wooden spoon
Whole milk or 2%
Powdered milk (secret ingredient)
Any additives, such as herb, flowers, grains, cornmeal, oatmeal, etc.
Colorant chips or liquid dye (optional)
Any fragrance oil or essential oil *(fragrance oils work great in rebatching)
Optional: additional oils such as sweet almond, jojoba, vitamin E
Mold/s (lightly greased with Vaseline)
Drying rack
You may half, quarter or double this recipe as needed.
Rebatching is a good way to get the feel for soap-making without having to handle any caustic ingredients. You can also use a double boiler, but we recommend the crock pot method. Takes about 2 hrs. to make.
Start by measuring out 4-6 cups of shredded base soap or as much as will fit into your crock pot without going past the half-way mark. Measure out about 1 cup of milk (you'll add this as needed, you may not use it all or you may need to add a bit more). Add ½ cup of milk to the crock pot and the shredded soap, put the lid on the pot and set it on the lowest temperature setting. Check the mixture every 15 min. or so and gently stir with your wooden spoon, but try not to make bubbles. If it looks very dry, add a little more milk, and so on, until all the shredded soap is melted.
After an hour or so, it should have the consistency of soft mashed potatoes. It also may look lumpy. Add about ½ cup of powdered milk. The powdered milk will make the mixture very smooth and easy to pour. Go ahead and add any additional ingredients, such as, Vit. E or grapefruit seed extract (which act as a preservative). You can also add additional oils ( ½ -1 tsp.) such as, castor (for shampoo like lather), almond oil or jojoba oil, etc. at this time.
When you're ready to add your colorant, herbs, and fragrance, remove the amount of soap needed for your size mold from the crock pot and place it into the measuring cup. Mix in your final ingredients, amounts of color, herbs, fragrance will vary depending on your liking, and pour into molds.
The soap should be easy to pour, but not too runny. Leave your soap in their molds overnight or until dry and remove the next dry. If you're having difficulty removing from the mold, place mold into the freezer for a few minutes for easier release.
Cure them for 1 week on a drying rack. Wrap individual soaps to preserve their scent.
Tip: As long as your crock pot is set at the lowest temperature, your can leave your soap simmering until your ready to mix and mold. Just check it to be sure it doesn't get too dry.
-From: http://www.pvsoap.com/instructionsforrebatch.htm
Friday, January 30, 2009
Liquid Soap Recipes3
All-Natural, No-Alcohol Liquid Soap Recipes

Making liquid soap is easy. Follow our instructions.
Please refer to our process page before attempting these recipes.
These recipes make about 4.5 gallons of liquid soap. Divide by 10 to make slightly less than one half gallon. Use 32 fluid of water to dilute this smaller batch.
MILK AND HONEY FACIAL CLEANSER
Follow the instructions for our Moisturizing Facial Cleanser (below). Dilute using 2 gallons purified or distilled water or distillate plus 9.5 oz. of our milk and honey nutrient base.
MOISTURIZING FACIAL CLEANSER
Lovely facial soap, formulated specially for dry or mature skins. The coconut oil provides deep cleansing, while the avocado and shea add moisture.
Oils: (by weight):
45 oz. coconut 76 degree
3 oz. shea butter
12 oz. avocado oil
25 oz. olive oil
40 oz. sunflower seed oil
Water = 48 fluid oz.
Potassium hydroxide = 26 oz. (by weight). This is a 3% lye discount.
Dilution water = 2 to 2.5 gallons
BASIC LIQUID SOAP
Oils: (by weight)
45 oz. coconut 76 degree
80 oz. sunflower seed oil
Water = 48 fluid oz.
Potassium hydroxide = 26 oz. (by weight). This is a 3% lye discount.
Dilution water = 2 to 2.5 gallons
SNOWDRIFT FARM SHAMPOO
Castor oil is the key to rich conditioning and super lather. Add 0.5% hydrolyzed silk protein after dilution for additional conditioning.
Oils: (by weight)
35 oz. castor oil
45 oz. coconut 76 degree
45 oz. sunflower seed oil
Water = 48 fluid oz. Potassium hydroxide = 26.5 oz. (by weight). This is a 3% lye discount.
Dilution water = 2 to 2.5 gallons
GOAT'S MILK LIQUID SOAP
Goat's milk may be added to any soap recipe. Reduce the water by 8 fluid oz. to compensate. Add .2 oz of potassium hydroxide (by weight) per 12 oz. goat's milk to saponify the goat's milk fat.
Please refer to our process page before attempting these recipes: http://www.snowdriftfarm.com/form_liquidsoap.html
Liquid Soap Recipes2
How to Make All-Natural, No-Alcohol Liquid Soaps
How to make liquid soaps
Making liquid soap is easy!
Unlike cold process soap, it is ready to use immediately after the process is complete. Our liquid soap is made via hot process. This method completes the
saponification very quickly. If you have cold process soapmaking experience, so much the better!
We use potassium hydroxide to saponify the oils in liquid soapmaking. In bar soapmaking we use sodium hydroxide. The potassium hydroxide molecules are larger than the sodium hydroxide molecules. It is this size difference that enables the potassium hydroxide to maintain a liquid state.
Safety rules in liquid soapmaking are the same as in cold process soapmaking.
When your soap is cooking, it will still be very caustic and sticky, especially at the beginning. Avoid skin contact. Keep vinegar neat to hand and douse skin
immediately after contact. Rinse thoroughly and repeat as needed till burning stops.
Never, Never, Never use anything other than stainless steel if you are using metal containers. ALUMINUM WILL CORRODE!!
Equipment
Equipment is simple--much the same as cold process soapmaking. The major addition is a double boiler in which to cook the soap. The inner pot MUST be made of stainless steel. The outer pot may be made of any material, but the inner pot must fit inside completely. This arrangement allows for a faster, more even cook. Size your pots to ensure that the soap batch fills one-third or more of the soap pot. An eight quart pot will process 125 oz. of oils -- enough to make between 4 and 5 gallons of liquid soap.
* double boiler with inner stainless steel pot
* 5 gallon bucket with Reike (pour spout) lid
* blankets or towels for insulation
* a stick blender a strong, stainless steel blade
* plastic (nylon) spoon
* plastic or stainless bowls to weigh lye and oils
* funnels
* rubber gloves
* goggles
* scale
* liquid measuring cups
* optional - sieve and cheesecloth
Thickening Natural Soaps:
The first thing I tell novice natural liquid soap makers is to limit the amount of dilution water you are using, if you want to have a thicken base. That said, you can also expect a lot more "activity" from a soap thickened in this manner.
If you have already diluted your soap batch and want to thicken, try adding a small amount of hydrated xanthan gum to the diluted base. You can also try adding 5%-7% liquid vegetable glycerin to the diluted batch, or a combination of both the xanthan gum and the glycerin.
How to Process
Review safety instructions. Click here.
Put required amount of distilled water into soap pot. Weigh potassium hydroxide and add to water. Since potassium hydroxide generates more heat than sodium hydroxide, it is important to insulate the bottom of the soap pot. The water will approach boiling. Set aside to cool, while you prepare the oils. Do not add goat's milk at this time. It will burn and ruin the soap.
Weigh oils and heat to 120-130F, 50-55C. The water & potassium hydroxide temperature must be approximately the same as the oil temperature before you combine the two phases.
The next step is the same as cold process soapmaking. The big difference is in how long you hold the trace process. In liquid soapmaking, we blend the soap base well beyond trace.
Combine the oils with the lye/water mix and mix for 2-3 minutes with the stick blender. Allow to rest for 5 minutes and blend again for another 2-3 minutes. Allow to rest for about 10 minutes, occasionally checking
consistency with the spoon. Continue the blend and rest cycles til the
soap reaches trace. Trace occur in this soap as it thickens and holds
dropped droplets on the surface for just a second.
NOTE: Do not become concerned should the soap partially or completely seize. This will be corrected during the cooking phase. Your current objective is a heavy trace. You may even have a bit of free (unsaponified) oil, at this time. If making goat's milk liqiud soap, add the goat's milk now. The heat and the lye strength have now been reduced to the point that the milk fats and proteins will not be damaged. Use a stick blender to insures a thorough mix. Your mix will become brown. We recommend using 12 oz. can of Meyenburg concentrated goats milk per 125 oz. of oil.
Formulating Notes:
1) Lye content - A lower lye discount is usual for liquid soaps, than for cold process soaps. 3 - 4% is normal, and will provide a transparent liquid soap. Higher oils contents will cloud the soap. Higher lye contents may require pH adjustment after saponification. This will reduce the soap's efficacy.
2) Palm oil and other high stearic acid content oils are not necessary to ensure a good soap. Shea, mango and cocoa butter should be kept low (below 2%). Wax contents, including jojoba, should be kept at less than 2% to ensure transparency. The fatty alcohols in waxes
do not dissolve and form a waxy, milky layer that floats at the top of the soap mix.
Finishing Up
Place the inner pot in the double boiler. Fill outer pot with water til it reaches the same height as the inner pots' soap level. Heat to boiling. Keep outer water level constant. Add water as necessary. Check the soap every 15 minutes, stirring well. At this point, you should see opaque soap curds and free oils.
Continue mixing these together. As the cooking progresses, the free oils will absorb into the soap
mass. After the first half hour of boiing and stirring, you can check a bit less frequently. As the soap cooks, it will convert to gel phase. It usually takes 4-8 hours of cooking to finish the soap.
When the soap is ready, it will be transparent, with no free liquid left. Be sure to turn the soap over completely from the bottom. The soap mass can trap liquids on the bottom, so turning it over is very important. Finished soaps will remain transparent on a spoon after it cools. When the soap is finished, it must be dissolved in water to be used as a liquid soap.
Boiling distilled water is needed for this step. Remove the soap pot from the double boiler and insulate well to retain heat.
Clean outer pot and use to boil the distilled water for the final dilution. Be very careful during this operation. Soap is at 212 F and will stick and scald if it contacts skin.
Boil 2.5 gallons of distilled water per 125 oz. oil weight in the soap base. When water reaches boiling, transfer the soap base to the empty 5 gallon plastic bucket or pail and pour the boiling water over it. Stir with a big clean spoon. Mix a little -- you're not after smoothness here -- just break up the soap mass.
Cover with lid and insulate the bucket completely -- including the bottom. The soap mass will gradually dissolve. Heat speeds the process.
Open bucket and stir once an hour for the first few hours, then once every 4-8 hours, til base is smooth. This may take several days. Add more boiling water if you still have undissolved soap after 2-3 days.
Once soap base is completely smooth, it's ready to use. Test pH with a pH test strip. Add up to 3% essential or fragrance oils, if desired. Some goat's milk soaps will develop a sludge at the bottom. Remove by filtering through cheesecloth placed in a sieve. Strain and decant. Add scent is desired.
See The Following post for easy to follow liquid soap recipes.
_________________
Liquid Soap Recipes1


An all natural, very mild liquid soap for everyday use in your kitchen or bath.
Ingredients: (Makes 2 - 8 oz bottles)
All ingredients were measured.
2 cups of grated (cured) castile soap
1 tablespoon of palm oil
1 teaspoon vodka
1/2 tablespoon glycerin (optional)
1/2 teaspoon lemon essential oil (or any EO)
1/2 teaspoon grapefruit essential oil (or any EO)
1/2 teaspoon eucalyptus essential oil (or any EO)
2 1/2-3 cups of spring or distilled water
2 pump or foaming bottles
Over low heat and in a double-boiler pan, add grated soap, palm oil, glycerin and water. Simmer until all the soap has melted and is liquefied. Add vodka. Removefrom heat and let cool slightly before adding the essential oils, mix well. Let cool completely before pouring into bottle and check the consistency (if too thick, add more spring water and stir). Using a funnel, slowly pour liquid soap into chosen bottle. Avoid any lumpy soap that may have not melted from going into the funnel. Label and use.
Cured Grated Castile Soap: Example Picture

This soap was made with powder pigment which will give the liquid soap color.
-From: http://www.pvsoap.com/recipe_liquid_soap.htm
Melt & Pour Glycerin Soap Recipes5
Burn Relief Soap

Ingredients:
1 cup of Soap flakes
1/8 cup of Aloe Vera gel
Instructions:
Follow melt & pour method;)
Aloe Vera soothes the skin and replenishes the vital nutrients in the skin.
Note:
This recipe is for Melt and pour Soap.
-From: http://www.craftbits.com/viewProject.do?projectID=473
Ingredients:
1 cup of Soap flakes
1/8 cup of Aloe Vera gel
Instructions:
Follow melt & pour method;)
Aloe Vera soothes the skin and replenishes the vital nutrients in the skin.
Note:
This recipe is for Melt and pour Soap.
-From: http://www.craftbits.com/viewProject.do?projectID=473
Melt & Pour Glycerin Soap Recipes4
Melt & Pour Recipes Apple with Leaf Soap

Ingredients: 1 pound White Soap Base
4 oz. Clear Soap Base
1 Tablespoon Apple Fragrance
Liquid Red Pigment
Liquid Woodland Green Pigment
Apple with Leaf Mold
Directions: Follow directions for layering mp soap. You may need to use a plastic dropper to get melted soap into small grooves of mold.
Baby Bootie Soap

Ingredients: 1 pound White Soap Base
1 Tablespoon Baby Powder Fragrance
Liquid Sea Green Color
Liquid Yellow Pigment
Baby Bootie Mold
Directions: Follow directions for layering mp soap. You may need to use a plastic dropper to get melted soap into small grooves of mold.
Candy Cane Soap

Ingredients: 1 pound White Soap Base
4 oz. Clear Soap Base
1 Tablespoon Peppermint Stick Fragrance
Liquid Red Pigment
Liquid Woodland Green Pigment
Candy Cane Mold
Directions: Follow directions for layering mp soap. You may need to use a plastic dropper to get melted soap into small grooves of mold.
Celtic Rectangle Bar

Ingredients: 1 pound White Soap Base
1 Tablespoon Lavender Fields Fragrance
Cosmetic Color Liquid Majestic Purple
Cosmetic Color Liquid Strawberry
Celtic Rectangle Mold
Directions: Follow basic directions for mp soap.
Chick and Egg Soap

Ingredients: 1 pound White Soap Base
1 Tablespoon Fragrance Oil of Choice
Cosmetic Color Liquid Yellow (for chick)
Cosmetic Color Liquid Orange (for beak)
Cosmetic Color Black Mica (for eye)
Chick and Egg Mold
Directions: Follow directions for layering mp soap. You may need to use a plastic dropper to get melted soap into small grooves of mold.
Chunky Bar Soap

Ingredients: 1 pound White Soap Base
8 oz. Clear Soap Base
1 Tablespoon Fragrance of Choice
Cosmetic Color of Choice (Clear Color Only)
Basic Shapped Mold of Choice
Directions: Follow basic soap making instructions steps. To make chunky soap, carefully cut white soap into chunks. Melt clear soap then color and fragrance. Pour into mold so that the mold cavity in about 1/2 full. Once the clear soap is cooled enough that it is just warm to touch...spritz the white chunks with lots of rubbing alcohol and drop them into the mold. The clear soap will come up and around the chunks.
Cross Soap

Ingredients: 1 pound White Soap Base
1 Tablespoon Calla Lily Fragrance
Cosmetic Color Lemon Yellow
Cosmetic Color Woodland Green Pigment
Cosmetic Color Strawberry Red
Cross Mold
Directions: Follow directions for layering mp soap. You may need to use a plastic dropper to get melted soap into small grooves of mold.
Duckie Soap

Ingredients: 1 pound Clear Soap Base
8 oz. White Soap Base (shred with cheese grater)
1 Tablespoon Fragrance of Choice
Cosmetic Color Ocean Blue
4 Mini Rubber Duck Toys
Basic Round Mold
Directions: Melt clear soap, fragrance and color. Pour into mold. Allow to cool just until skin form on top of soap. Spritz with rubbing alcohol, add shredded soap and rubber duck toy. Allow to completely harden. Carefully unmold.
Gingerbread Man Soap

Ingredients: 1 pound Clear Soap Base
1 Tablespoon Gingerbread Fragrance
Cosmetic Color Liquid Brown Sparkle Mica
Directions: Follow directions for layering mp soap. You may need to use a plastic dropper to get melted soap into small grooves of mold.
-From: http://www.soapteacher.com/StoreCategory.aspx?CategoryID=3&CategoryName=Melt+%26+Pour+Glycerin
Melt & Pour Glycerin Soap Recipes3
Color Blend Melt & Pour Soap Tutorial
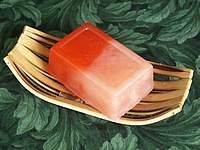
^Above^ The finished product - A beautiful bar of color-blended soap!
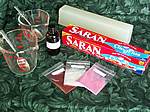
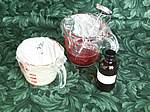
Prepare your ingredients. You will need two microwave-proof containers.
Color and scent both bases. (See Basic Melt and Pour instructions in the following post!)
Test temperature. If the temperature of either base is higher than 130 ºF, cover base with saran wrap and check temperature every five minutes.
When base is 120 ºF to 130 ºF (this applies ONLY to Bramble Berry, Inc. bases - other melt and pour bases have higher or lower temperature points. If using another brand of base, the base should not be steaming and be slightly viscous and within 60 to 90 seconds of setting up), make sure the colorants and fragrance are stirred in completely.
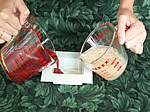
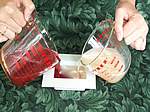
Pick up both colors. Position each colorant on opposite sides of the mold and start pouring slowly. Keep each color of base as close to the opposing sides of the mold as possible. By pouring slowly, you'll inhibit the colorant mixing.
Spray the poured soap with alcohol and wait 3 to 4 hours until the base is set up before popping out of molds and wrapping.
-From: http://www.teachsoap.com/colorblend.html
^Above^ The finished product - A beautiful bar of color-blended soap!
Prepare your ingredients. You will need two microwave-proof containers.
Color and scent both bases. (See Basic Melt and Pour instructions in the following post!)
Test temperature. If the temperature of either base is higher than 130 ºF, cover base with saran wrap and check temperature every five minutes.
When base is 120 ºF to 130 ºF (this applies ONLY to Bramble Berry, Inc. bases - other melt and pour bases have higher or lower temperature points. If using another brand of base, the base should not be steaming and be slightly viscous and within 60 to 90 seconds of setting up), make sure the colorants and fragrance are stirred in completely.
Pick up both colors. Position each colorant on opposite sides of the mold and start pouring slowly. Keep each color of base as close to the opposing sides of the mold as possible. By pouring slowly, you'll inhibit the colorant mixing.
Spray the poured soap with alcohol and wait 3 to 4 hours until the base is set up before popping out of molds and wrapping.
-From: http://www.teachsoap.com/colorblend.html
Melt & Pour Glycerin Soap Recipes2
Melt & Pour Glycerin Soap

Basic Materials:
Melt & Pour Soap Base
Glass measuring cup or bowl
Soap mold/s
Fragrance: essential oils or fragrance oils
Any additives, such as herbs, flowers, aloe vera, vitamin E, honey,
or powdered ingredients, such as oatmeal or apricot meal, etc.
Soap colorants: cosmetic grade (liquid dyes or color nuggets)
Wooden stirs or craft sticks for stirring
Small fine spray bottle of alcohol
Microwave (preferred), or double boiler
Directions:
Cut desired amount of soap base into 1" chunks and place into your glass measuring cup. Microwave at 20-30 second intervals until all the chunks are liquefied, avoid boiling. Add your colorant, a small amount at a time, until the desired color is achieved. Stir slowly to prevent bubbles. If you are using color nuggets, melt a portion alongwith your soap to achieve the desired shade. Set aside for a few minutes to prepare your mold/s, fragrance and any additives. Set your mold on a level surface and be sure its clean and dry. Begin adding your additivesand fragrance (about ¼ - ½ tsp. per cup of M&P) to the melted soap. Avoid adding the fragrance while the soap is too hot or the scent may burn off from the heat of the soap. However, waiting too long will cause the soap to begin to set up and form a top skin. Once you have incorporated your additives and fragrance, pour the soap into your mold. If you have bubbles forming on the surface, spritz them lightly with the alcohol. Let soapcool for 30 minutes or until firm and remove from mold. Putting the mold in the freezer for a few minutes will help the soaps release easier. Air dry on a rack or wax paper overnight and wrap in cello bags, decorative paper, shrink wrap or saran wrap to preserve the fragrance.
Tips:
Pure glycerin soap can also be re-melted with little or no additives, fragrance or colorants. You can also use found objects as molds, such as plastic drawer organizers or Jello molds, etc. Try experimenting, it's a fun and useful craft.
_________________
Melt & Pour Glycerin Soap Recipes1
Basic Melt and Pour Soap Tutorial
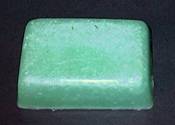
^ABOVE:^ The finished product - a beautifully handcrafted bar of soap!
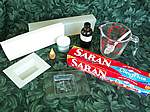
step one
You can melt the base in a double boiler or the microwave. If you choose the microwave, make sure you cover the bowl you are melting the melt and pour (MP) with Saran Wrap to keep the excess moisture from evaporating out. Simply melt the base on high for one minute and stir the remaining, unmelted pieces in.
If you use a double-boiler, simply bring the water to boil, add your melt and pour, cover, turn the heat on low and walk away. Check on the base periodically to see it it's melted.
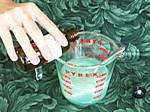
step two
If you add fragrance oil, add it after the base is fully melted. Stir until the fragrance is fully incorporated and the base doesn't look "cloudy." Start with .25 ounce per pound of base and work up or down from there. You can also use essential oils.
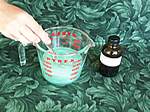
step three
If you wish to add colorant, add the color when the base is melting. Just throw in 1/8 teaspoon to 1/4 teaspoon mica with the melting base and stir it in really well. Spray any "mica bubbles" that form on the top with rubbing alcohol. To use food coloring, simply put in 1 drop at a time to your melted base and color to preference. Too much can stain hands and towels, so be careful!
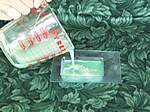
step four
Pour into your molds - and spray the top with rubbing alcohol to get rid of any excess bubbles.
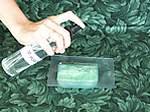
step five
Use and enjoy once the soap is hard - which takes a few hours.
-From: http://www.teachsoap.com/mp.html
^ABOVE:^ The finished product - a beautifully handcrafted bar of soap!
step one
You can melt the base in a double boiler or the microwave. If you choose the microwave, make sure you cover the bowl you are melting the melt and pour (MP) with Saran Wrap to keep the excess moisture from evaporating out. Simply melt the base on high for one minute and stir the remaining, unmelted pieces in.
If you use a double-boiler, simply bring the water to boil, add your melt and pour, cover, turn the heat on low and walk away. Check on the base periodically to see it it's melted.
step two
If you add fragrance oil, add it after the base is fully melted. Stir until the fragrance is fully incorporated and the base doesn't look "cloudy." Start with .25 ounce per pound of base and work up or down from there. You can also use essential oils.
step three
If you wish to add colorant, add the color when the base is melting. Just throw in 1/8 teaspoon to 1/4 teaspoon mica with the melting base and stir it in really well. Spray any "mica bubbles" that form on the top with rubbing alcohol. To use food coloring, simply put in 1 drop at a time to your melted base and color to preference. Too much can stain hands and towels, so be careful!
step four
Pour into your molds - and spray the top with rubbing alcohol to get rid of any excess bubbles.
step five
Use and enjoy once the soap is hard - which takes a few hours.
-From: http://www.teachsoap.com/mp.html
_________________
Cold Process Soap Recipes 3
Silk Soap - Cold Process Soap Recipe by Leila Gaines
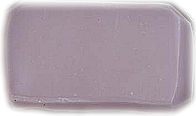
GOAL:
To create a hard bar with a silky sheen, that is both moisturizing and with great lather. Silk proteins added for added skin pampering. Very faint coloring.
Your base ingredients
Sweet Almond Oil .............................5 oz (6.25%)
Castor Oil.............................3 oz (3.75%)
Coconut Oil.............................16 oz (20.00%)
Olive Oil.............................28 oz (35.00%)
Palm Oil.............................8 oz (10.00%)
Palm Kernel Oil.............................4 oz (5.00%)
Shea Butter.............................8 oz (10.00%)
Pistachio Oil.............................5 oz (6.25%)
Emu Oil.............................3 oz (3.75%)
10.76 oz lye (I use 305g as individual grams are easier to measure and control on the scale.
8% superfat
24 oz water
pinch of silk fibers (a little less than 2 grams) or 1/2 tsp. of liquid silk
Mix at 100 degrees
2 oz fragrance, mixed with 1 oz of the reserved almond oil
1/2 tsp mica color
How to mix 'em up
1. Line wooden mold or prepare plastic molds. Don goggles & gloves. Mix lye with water. Stir until clear. Add silk. Stir until dissolved. Let rest while preparing oils.
2. Melt PKO, Palm & Coconut oil together. Add castor oil. In separate container, measure out olive oil, pistachio oil, 4 oz of Almond oil together. In third container, melt Shea butter, add emu oil.
3. Add lye to coconut/PKO/Palm/castor oil mixture. Zap with stick blender until liquid is well mixed and lighter in color. Add olive oil & nut oil mixtures. Zap with stick blender for a 10 second burst. Add shea butter mixture. HANDSTIR. (Shea butter sets trace very quickly). Keep stirring until light trace is achieved. Add almond oil/fragrance mixture. Stir.
4. Take out 1 c. of mixture. Add mica color. Whisk until mica is completely dissolved and there are no dots of color. Mixture should be creamy smooth. Add to rest of soap, and stir until completely mixed, or swirl into soap for effect, as you prefer.
5. For CP Method: Pour into mold. Cover mold, wrap in a blanket, paying attention to all the corners, and do not peek for 24 hours. Unmold, cut, and cure for a minimum of 6 weeks.
6. CPOP Method: Pour into mold (untreated wood, lined with freezer paper). Add freezer paper shiny side to soap on top of soap. Cover mold. Pop into preheated 170 degree oven for 90 minutes. NO PEEKING. Turn off oven, and let soap sit in oven for at least 12 hours. I recommend 18. Take soap out, slice and cure for 1 to 2 weeks.
Notes: I've made this soap with Violet FO, and used violet pearl mica to swirl the soap. I have very subtle veins of lavender throughout a creamy, shiny soap with a scent that is marvelously complex. Floral, old-fashioned, almost fruity. Very feminine.
-From: http://www.teachsoap.com/silkcp.html
_________________
Olive Cream Soap

A delightful summer scented soap with a fresh green tint will brighten up the dullest of days....
You'll like this one as much as we do!
Ingredients:
35 ozs Coconut 76 Oil
20 ozs Olive Oil
16 ozs Palm Oil
15 ozs Olive Butter
12.5 ozs Sodium Hydroxide
32 ozs Distilled Water
Chrome Green Iron Oxide
Yellow Iron Oxide
4 ozs Olive Cream Fragrance Oil
Follow the basic instructions for cold process soap. Just before trace add 2-3 tablespoons of green and yellow oxide to achieve the color. Then add the fragrance oil and pour into your mold. We stamped the soap bars with our Soap Stamps, after they where cut into cubes about a day or two after taken out of the mold.
Weigh all ingredients. Recipe makes 8 lbs.
-From: http://www.pvsoap.com/recipe_olive_cream_soap.htm
_________________
_________________
_________________
Shea-Mango Conditioning Soap

This is a creamy, all-over body soap, enriched with soothing pure shea and mango butters. We've kept ours without any scent, but feel free to add any scent you wish.
Recipe makes 4 lbs. (approximately 16 - 4 oz bars). Follow the basic instructions for cold process soap making.
Ingredients: (weigh all ingredients)
16 ounces olive oil
16 ounces coconut oil or palm kernel flakes
8 ounces shea butter
8 ounces mango butter
17 ounces water
6.8 ounces sodium hydroxide (lye)
2 ounces of fragrance (optional)
Chenille Washcloths

Your handcrafted soap will be even more special along side one of these plush, all-cotton chenille washcloths that you knit. Made of 100% cotton chenille yarn by Crystal Palaceâ„¢ available at Perfect Touch Yarns, http://www.ptyarns.com.
Pattern available in Weekend Knitting : 50 Unique Projects and Ideas (Hardcover)
by Melanie Falick: Click HERE!
-From: http://www.pvsoap.com/recipe_sheasoap_washcloth.htm
_________________
GOAL:
To create a hard bar with a silky sheen, that is both moisturizing and with great lather. Silk proteins added for added skin pampering. Very faint coloring.
Your base ingredients
Sweet Almond Oil .............................5 oz (6.25%)
Castor Oil.............................3 oz (3.75%)
Coconut Oil.............................16 oz (20.00%)
Olive Oil.............................28 oz (35.00%)
Palm Oil.............................8 oz (10.00%)
Palm Kernel Oil.............................4 oz (5.00%)
Shea Butter.............................8 oz (10.00%)
Pistachio Oil.............................5 oz (6.25%)
Emu Oil.............................3 oz (3.75%)
10.76 oz lye (I use 305g as individual grams are easier to measure and control on the scale.
8% superfat
24 oz water
pinch of silk fibers (a little less than 2 grams) or 1/2 tsp. of liquid silk
Mix at 100 degrees
2 oz fragrance, mixed with 1 oz of the reserved almond oil
1/2 tsp mica color
How to mix 'em up
1. Line wooden mold or prepare plastic molds. Don goggles & gloves. Mix lye with water. Stir until clear. Add silk. Stir until dissolved. Let rest while preparing oils.
2. Melt PKO, Palm & Coconut oil together. Add castor oil. In separate container, measure out olive oil, pistachio oil, 4 oz of Almond oil together. In third container, melt Shea butter, add emu oil.
3. Add lye to coconut/PKO/Palm/castor oil mixture. Zap with stick blender until liquid is well mixed and lighter in color. Add olive oil & nut oil mixtures. Zap with stick blender for a 10 second burst. Add shea butter mixture. HANDSTIR. (Shea butter sets trace very quickly). Keep stirring until light trace is achieved. Add almond oil/fragrance mixture. Stir.
4. Take out 1 c. of mixture. Add mica color. Whisk until mica is completely dissolved and there are no dots of color. Mixture should be creamy smooth. Add to rest of soap, and stir until completely mixed, or swirl into soap for effect, as you prefer.
5. For CP Method: Pour into mold. Cover mold, wrap in a blanket, paying attention to all the corners, and do not peek for 24 hours. Unmold, cut, and cure for a minimum of 6 weeks.
6. CPOP Method: Pour into mold (untreated wood, lined with freezer paper). Add freezer paper shiny side to soap on top of soap. Cover mold. Pop into preheated 170 degree oven for 90 minutes. NO PEEKING. Turn off oven, and let soap sit in oven for at least 12 hours. I recommend 18. Take soap out, slice and cure for 1 to 2 weeks.
Notes: I've made this soap with Violet FO, and used violet pearl mica to swirl the soap. I have very subtle veins of lavender throughout a creamy, shiny soap with a scent that is marvelously complex. Floral, old-fashioned, almost fruity. Very feminine.
-From: http://www.teachsoap.com/silkcp.html
_________________
Olive Cream Soap
A delightful summer scented soap with a fresh green tint will brighten up the dullest of days....
You'll like this one as much as we do!
Ingredients:
35 ozs Coconut 76 Oil
20 ozs Olive Oil
16 ozs Palm Oil
15 ozs Olive Butter
12.5 ozs Sodium Hydroxide
32 ozs Distilled Water
Chrome Green Iron Oxide
Yellow Iron Oxide
4 ozs Olive Cream Fragrance Oil
Follow the basic instructions for cold process soap. Just before trace add 2-3 tablespoons of green and yellow oxide to achieve the color. Then add the fragrance oil and pour into your mold. We stamped the soap bars with our Soap Stamps, after they where cut into cubes about a day or two after taken out of the mold.
Weigh all ingredients. Recipe makes 8 lbs.
-From: http://www.pvsoap.com/recipe_olive_cream_soap.htm
_________________
  Cold Process Goats Milk Soap: Makes 4 lbs. Weigh all ingredients, following basic cold process method. 8 oz. distilled water (cold) 8 oz. goat milk (cold) 6.5 oz. lye (sodium hydroxide) 8 oz. palm oil 17 oz. coconut 76 oil 17 oz. olive oil 1 oz grapefruit seed extract 2-3 ozs. essential oil Mix the distilled water and goat milk together in a container. Add the lye to the water/goat milk mixture and watch as it turns a tan color. Stir in all the lye. Let sit about 10 minutes. Don't be concerned about the temperature of the lye mixture or oils mixture. Prepare your oils, add lye/water/goat milk mixture to the oils. The lye/water/goat milk mixture will look curdled, stir and add it to the pot of oils. Using a stick blender mix well and continue through to trace. Add grapefruit seed extract as a preservative and any scent you like. We've chosen Ginger Essential Oil for a wonderful "Zen" scent. Pour into your mold, cover and let set 20-24 hrs. Cure cut soap for 4 weeks. Goats milk soap has a creamy smooth texture and is very nourishing for your skin. -From: http://www.pvsoap.com/recipe_goats_milk_soap.htm |
 Castile/Castila Soap  From Castile, or Castilia, a province in Spain, from which it originally came. A kind of fine, hard, white or mottled soap, made with olive oil and soda. Although this soap is slow to lather, a little work yields an abundance of rich, creamy suds mild enough for the most sensitive skin. Castile soap is so gentle, it's often used as baby's first soap. Makes 2 lbs. Very Easy. Follow the basic cold process soap making instructions. Soap temperature 100-120°, a bit hotter should be fine since this is a small batch and will loose heat quickly. Cure for 6 weeks for best results. 1. 8 lbs of Pure 100% Olive Oil 1 oz of beeswax pearls (gives this bar a silky texture) 4 ozs of lye (sodium hydroxide) 10 ozs of distilled water Melt the beeswax in the olive oil until temperatures reach approximately 120°. Add the lye to the water stirring well (follow basic cold process instructions) and add to the oil/beeswax mixture when it cools to 120°. Stir until trace and pour into mold. Optional additional additives: Ground dried chamomile 1/4 cup or less and chamomile fragrance oil (2 ozs.) added at trace. -From: http://www.pvsoap.com/recipe_castile_soap.htm |
Shea-Mango Conditioning Soap
This is a creamy, all-over body soap, enriched with soothing pure shea and mango butters. We've kept ours without any scent, but feel free to add any scent you wish.
Recipe makes 4 lbs. (approximately 16 - 4 oz bars). Follow the basic instructions for cold process soap making.
Ingredients: (weigh all ingredients)
16 ounces olive oil
16 ounces coconut oil or palm kernel flakes
8 ounces shea butter
8 ounces mango butter
17 ounces water
6.8 ounces sodium hydroxide (lye)
2 ounces of fragrance (optional)
Chenille Washcloths
Your handcrafted soap will be even more special along side one of these plush, all-cotton chenille washcloths that you knit. Made of 100% cotton chenille yarn by Crystal Palaceâ„¢ available at Perfect Touch Yarns, http://www.ptyarns.com.
Pattern available in Weekend Knitting : 50 Unique Projects and Ideas (Hardcover)
by Melanie Falick: Click HERE!
-From: http://www.pvsoap.com/recipe_sheasoap_washcloth.htm
_________________
Subscribe to:
Posts (Atom)